Welcome to Nikon School. The official Nikon education experts to help you learn how to get the best from your Nikon Camera and Lenses

Shooting Portraits

Follow these hints and tips and let our Nikon School expert Neil guide you through the best set ups to maximize your portraiture photography

Portrait Photography

Are you trying to shoot better portraits while at home? Check out the following tips which should help you shoot some inspiring portrait images, whether you are shooting with window light, ambient light in the garden or with light modifiers. Using these techniques, you can shoot a range of different portraits, be it a self portrait, a group shot of loved ones or friends.

First step is to think about the light. If you’ve taken part in the previous #CreateYourLight challenges about how to shoot with window light or using ‘gear hacking’ tips to build your own home studio or light modifiers, you will have an understanding of the type of light you want to work with. The light in your image is very important, and is often the difference between a snapshot and great photo. For more information on understanding light, you might want to take a look at both our gear hacking and shooting with window light hints and tips pages.

Composition

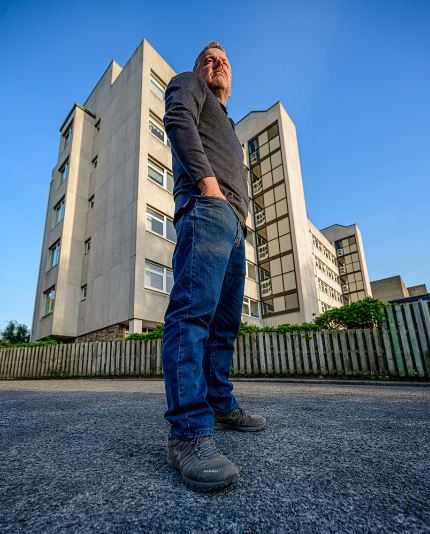
How you compose your image is crucial to getting a great portrait. Your viewpoint, angle and framing are very important to ensure you get the best image possible. If you are looking at a scene and can’t work out how to frame or compose the image, there are some universal composition techniques that could give you inspiration. Remember the composition of your image does not need to be complicated, often the simplest compositions make for the most striking images and don’t forget that
composition includes all of the items in the image, not just your main subject.

Composition in photography is not a science, what works for one image will not always work for another. Your lens choice and the viewpoint you choose will also impact the composition and the way your final image looks.

Don’t forget that using light correctly is also a key element of composition, when you look at a photo or painting your eye has a natural tendency to be drawn to the brightest part of the image. If we use light carefully in our images, we can use this knowledge to direct anyone looking at the image exactly where we want them to look. This combined with some of the other tips below regarding lens choice and aperture selection help us to make the viewer pay even more attention to the subjects in our portraits. Try some out some of these composition ideas:

Simplify the Scene

By simplifying your portrait composition you will immediately draw the viewer’s eye into the main part of your image. Some of the most powerful images are actually very simple compositions. As a general rule images that have simple composition elements tend to be more appealing than complicated ones that need an explanation of what someone is looking at.

Implied Direction

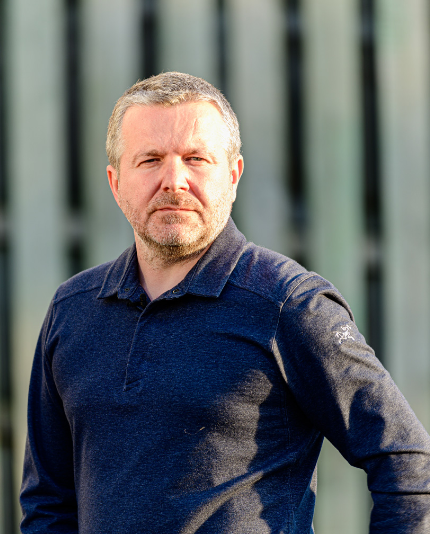
When you look at a portrait, you tend to follow the subject's gaze. This leads your eye in the direction the subject is looking. The most common approach is to have a subject on the left or right of an image and them looking into the frame and towards the main light source. If however, you want to provoke a sense of mystery with your image, have your subject look ‘out’ of the frame. This can leave the viewer intrigued and wondering what the subject is looking at just out of shot.

Leading Lines

Leading lines can be used to control exactly where you want the viewers eyes to look in your image. The concept is a simple one, you use lines in your image to take your viewers eyes toward the main subject in your portrait. Leading lines do not have to be straight; curves and diagonal can also be used to great effect.

Tilt the Camera

Another way to add a dynamic feel to your portraits is to tilt the camera slightly, so the image is angled. This technique is known in the industry as ‘dutch tilt’ as was pioneered in the early days of hollywood portraiture. This is best done when shooting on wider focal lengths such as 16, 20 or 24mm due to the perspective that these lenses give. Be careful not to make your tilt or angle too steep. You probably
shouldn’t be going more than 5 or 10 degrees from the vertical.

Rule of thirds

This is probably the most commonly used composition technique. Effectively you are trying not to place your subject in the middle of the frame. Divide your frame vertically into thirds with a left and right third, and then place your subject off centre towards or on one these thirds. This works very well when combined with the ‘implied direction’ concept.

Viewpoint and Perspective

The viewpoint you choose to shoot your images can drastically change the dynamic and appearance of an image. By shooting from above or below your subject you alter the perception of your subject's size. To emphasize the height of your subject, you would shoot from below, with the camera pointing upwards and ideally on a wide angle lens. To make your subject seem smaller, shoot from above with the camera angled down. This is thought to be very flattering, especially if combined with a very slight ‘dutch tilt’. You can also change the perception of a subject's size by shooting from a distance or close-up using wide angle or telephoto lenses. This results in the ‘forced perspective’ look where you can appear larger or smaller relative to an adjacent object.

Abstracts

Remember that a portrait doesn’t always include a face; zooming in on details like a baby’s tiny toes, or the characterful lines on someone's hands can be equally evocative. They also don’t always have to include the entire head of your subject. Think about how some fashion images are shot, cropping the image tight to bring out the subjects eyes. Using interesting crops such as half of a face or a close-up of an eye can make for a very striking image. Bringing abstract and forced composition techniques together can also make some really interesting images, such as the famous painting of the person in the bowler hat holding the apple in front of their face. Reflections in sunglasses or mirrors can also produce some interesting abstract images. A good trick is to position two mirrors opposite each other to create an infinite number of reflections of your subject. Shooting through a glass sphere or into the edge of bevelled glass can produce some good portrait
effects. Even holding another lens in front of your camera will and shooting through that gives some interesting results.

Backgrounds

These shouldn’t distract from the main subject. Watch out for lamps, branches or other objects unintentionally “growing out of” the subject’s head. As covered in the the #CreateYour Light window light challenge, photographing against a bright background may well result in a silhouette if you want to create this look. If you want to create bokeh in your foreground and background shoot with a lens that allows you to get to f/1.8 or f/1.4.

Connect with your subject

If you are shooting portraits of family or friends, even when you know them really well, people have a habit of freezing in front of the camera. Help put them at their ease by chatting or getting the people in the image to look at each and not the camera, they will soon forget you are there. You can use this technique to produce documentary style portraits, just make sure your subjects are in good light before you start photographing. Another tip would be to use a ‘triangle’ effect for groups if
possible. This means that the tallest subjects are in the centre of the frame with other people who are less tall on the edges of the frame. To even out any large height discrepancies in an image you can always ask people to sit on steps, stairs or a sofa. If you are taking a head and body shot, your subject will look best with their body angled slightly away from you. Get them to turn their body maybe 45 degrees away from you, then, without moving their shoulders, turn their head back to face you. This is also a more flattering pose and it helps slim people down if done correctly and works for groups as well as single portraits. Your subject doesn’t always have to be smiling in an image, your (or your subjects) mood on the day of the shoot could be an inspiration for the image, perhaps even the weather and light could be an influence. A dark overcast day will give you very little light to work with resulting in a very atmospheric image. Rain cascading down a window pane with your subject looking out also tells a story and sets a mood for your image.

Once you are familiar with the composition techniques, you will start to see them everywhere; in iconic pictures and famous paintings, or the cinematography in feature films and TV programmes. These are also great places to look for inspiration for your ideas. You will also start to understand why some photos ‘work’ while others just seem like a simple snapshot. Now you have some ideas about the light and composition for your portrait we can start to think about lenses and the camera settings to use.

Lens and focal length choice

The lens you use has a major impact when shooting portraits: too wide and it will distort the face, making features appear bigger, while using too long a telephoto lens if you have the space will compress your subject’s face, creating an unnatural-looking, “flattened” result. Your ideal focal lengths would be something between 50mm to 200mm. For indoor portraits, this can mean prime lenses such as the 50mm or 85mm f/1.8 and if you have space the 105mm. Alternatively a great all round zoom is really useful and would be my preferred approach, this would be something that covers 24-70mm or 24-120mm. If you have a DX camera, the 35mm f/1.8 G is probably the prime lens of choice for portraits and the either the 16-80mm f2.8-4 or 18-140mm as the go to zoom lenses if you can get outside into the garden and have the space,shooting further back at 200mm will give you a much more dramatic looking image than shooting at 70mm. Shooting at a longer focal length brings into play a concept known as lens compression which allows you to have more separation between your subject and the background. This when combined with a low aperture such as f/2.8 will give your subject an almost 3D effect and make them really stand out from the background putting more emphasis on your subject. If you have a small room to work in or a cluttered untidy space as your shooting location having a lens that allows you to shoot at f/2.8 or even
better f/1.8 will allow you to blur out the backgrounds to prevent the competing with and becoming a distraction to your subject.

Shooting Modes & Exposure Settings

Your image’s exposure is the combined result of the shutter speed, aperture and ISO sensitivity, and all that’s dependent on the available light. Every situation is going to be different as the light will change depending on the time of day and whether you have a bright or overcast day. If you are shooting inside a good starting place is to set the ISO to 100 or 200, then turn on Auto ISO if your camera has that setting. You can then set the mode dial to aperture priority and choose f/4 or f/5.6 – these apertures will give you a reasonable depth of field for a single portrait while ensuring your entire subject is in focus. The camera will then automatically select the corresponding shutter speed; ideally you will want at least 1/100th of sec or higher to ensure a sharp picture. Auto ISO will automatically increase your ISO if there isn’t enough available light to achieve this. If you are setting your ISO manually, increase it to 800 or 1600 and then focus the scene again. To have full control over the light, shutter speed and aperture, you may want to consider putting the camera into manual mode, still leave the ISO set to Auto, but now you can
set both the aperture and shutter speed to create exactly the image you want.

Metering the Image

With the advanced metering systems in available now, for the vast majority of your images, keep the cameras in set to matrix metering; it calculates an average exposure for the whole scene and yields results which are usually spot-on. However, there are some rare situations where you may want to change to spot metering for example if your subject is heavily backlit and you do not have access to a fill light.

White balance

To capture healthy looking skin tones, it’s vital that your camera's white balance (in the shooting menu) is set for the light you are working with. The easiest way to do this is to set auto white balance, where the camera determines the colour temperature of the light and selects the most appropriate pre-programmed setting to create natural-looking colours in your image. This works well when the lighting is more or less of one type (such as sunlight), but there are plenty of situations where you’ll want to be the one making the choices, and that’s where manual white-balance settings will be needed.

Focusing

For portraits if you are using a DSLR, I would suggest you use single point focus as this is the most accurate focusing mode you can use for this subject. Always try to move the focus point onto your subject's eye or face. If you include a face in the image, make sure your subject's eyes are pin sharp so they really draw the viewer into the image. If you have a Z series camera and the latest firmware, you could also take advantage of the sophisticated face tracking and eye tracking autofocus features, which automatically detects faces or eyes depending on the distance you are standing from the subject. This is a very fast and accurate way of focusing and tends to be my go to focusing approach for portraits. I hope you have found these portraiture ideas useful and inspiring, there are many more ways in which you can shoot great portraits, but these tips and techniques are a good place to start. We looking forward to seeing the images you are able to create using them and would love you to share your images using the hashtag #CreateYourLight and to take part in this weeks portrait challenge.

Triggering the Camera

If you are shooting self portraits, ideally you will have the camera setup on a tripod or resting on a solid surface such as a table, desk or wall. You can then either use a remote trigger such as the ML-L3 ot the WR-10 radio remote triggers. If you don’t have a rmote trigger you could always put the camera in to self timer mode, different cameras allow a range of various setups for this, from just taking a single image after 10 secs, to setting a delay of 20 secs and then for the camera to shoot 5 images at 1 second intervals. If you want to use your smart device, you can either use the Nikon Remote control apps depending on the age of your camera. Either Wireless Mobile Utility (WMU) for older cameras if supported or for more recent cameras use Snapbridge, which is how I’ve been composing and shooting my self portraits.


Want to read offline?

You can now download a PDF version of this Hints & Tips article to read offline and print

DOWNLOAD

NIKKOR Lenses
NIKKOR Lenses