Welcome to Nikon School. The official Nikon education experts to help you learn how to get the best from your Nikon Camera and Lenses

Your essential guide to Nikon autofocus

While post-production editing can sort out many issues, an out-of-focus image isn’t one of them. Sharp shots are essential for great photography, so here’s everything you need to know about autofocus on your Nikon DSLR or Z series camera.

There are no two ways about it: a soft, blurry, out-of-focus image will always be soft, blurry and out of focus. Sure, you might want to deliberately use image blur as a creative effect, but that’s a different ball game to simply not getting it sharp in-camera. Knowing how to focus accurately and which autofocus (AF) modes to use is one of the most essential photography skills.

Accurate focus is vital because your depth of field revolves around the point of focus. Miss your focus point and the depth of field might be in the wrong place – so the wrong part of the image ends up sharp, while the crucial part is blurred.

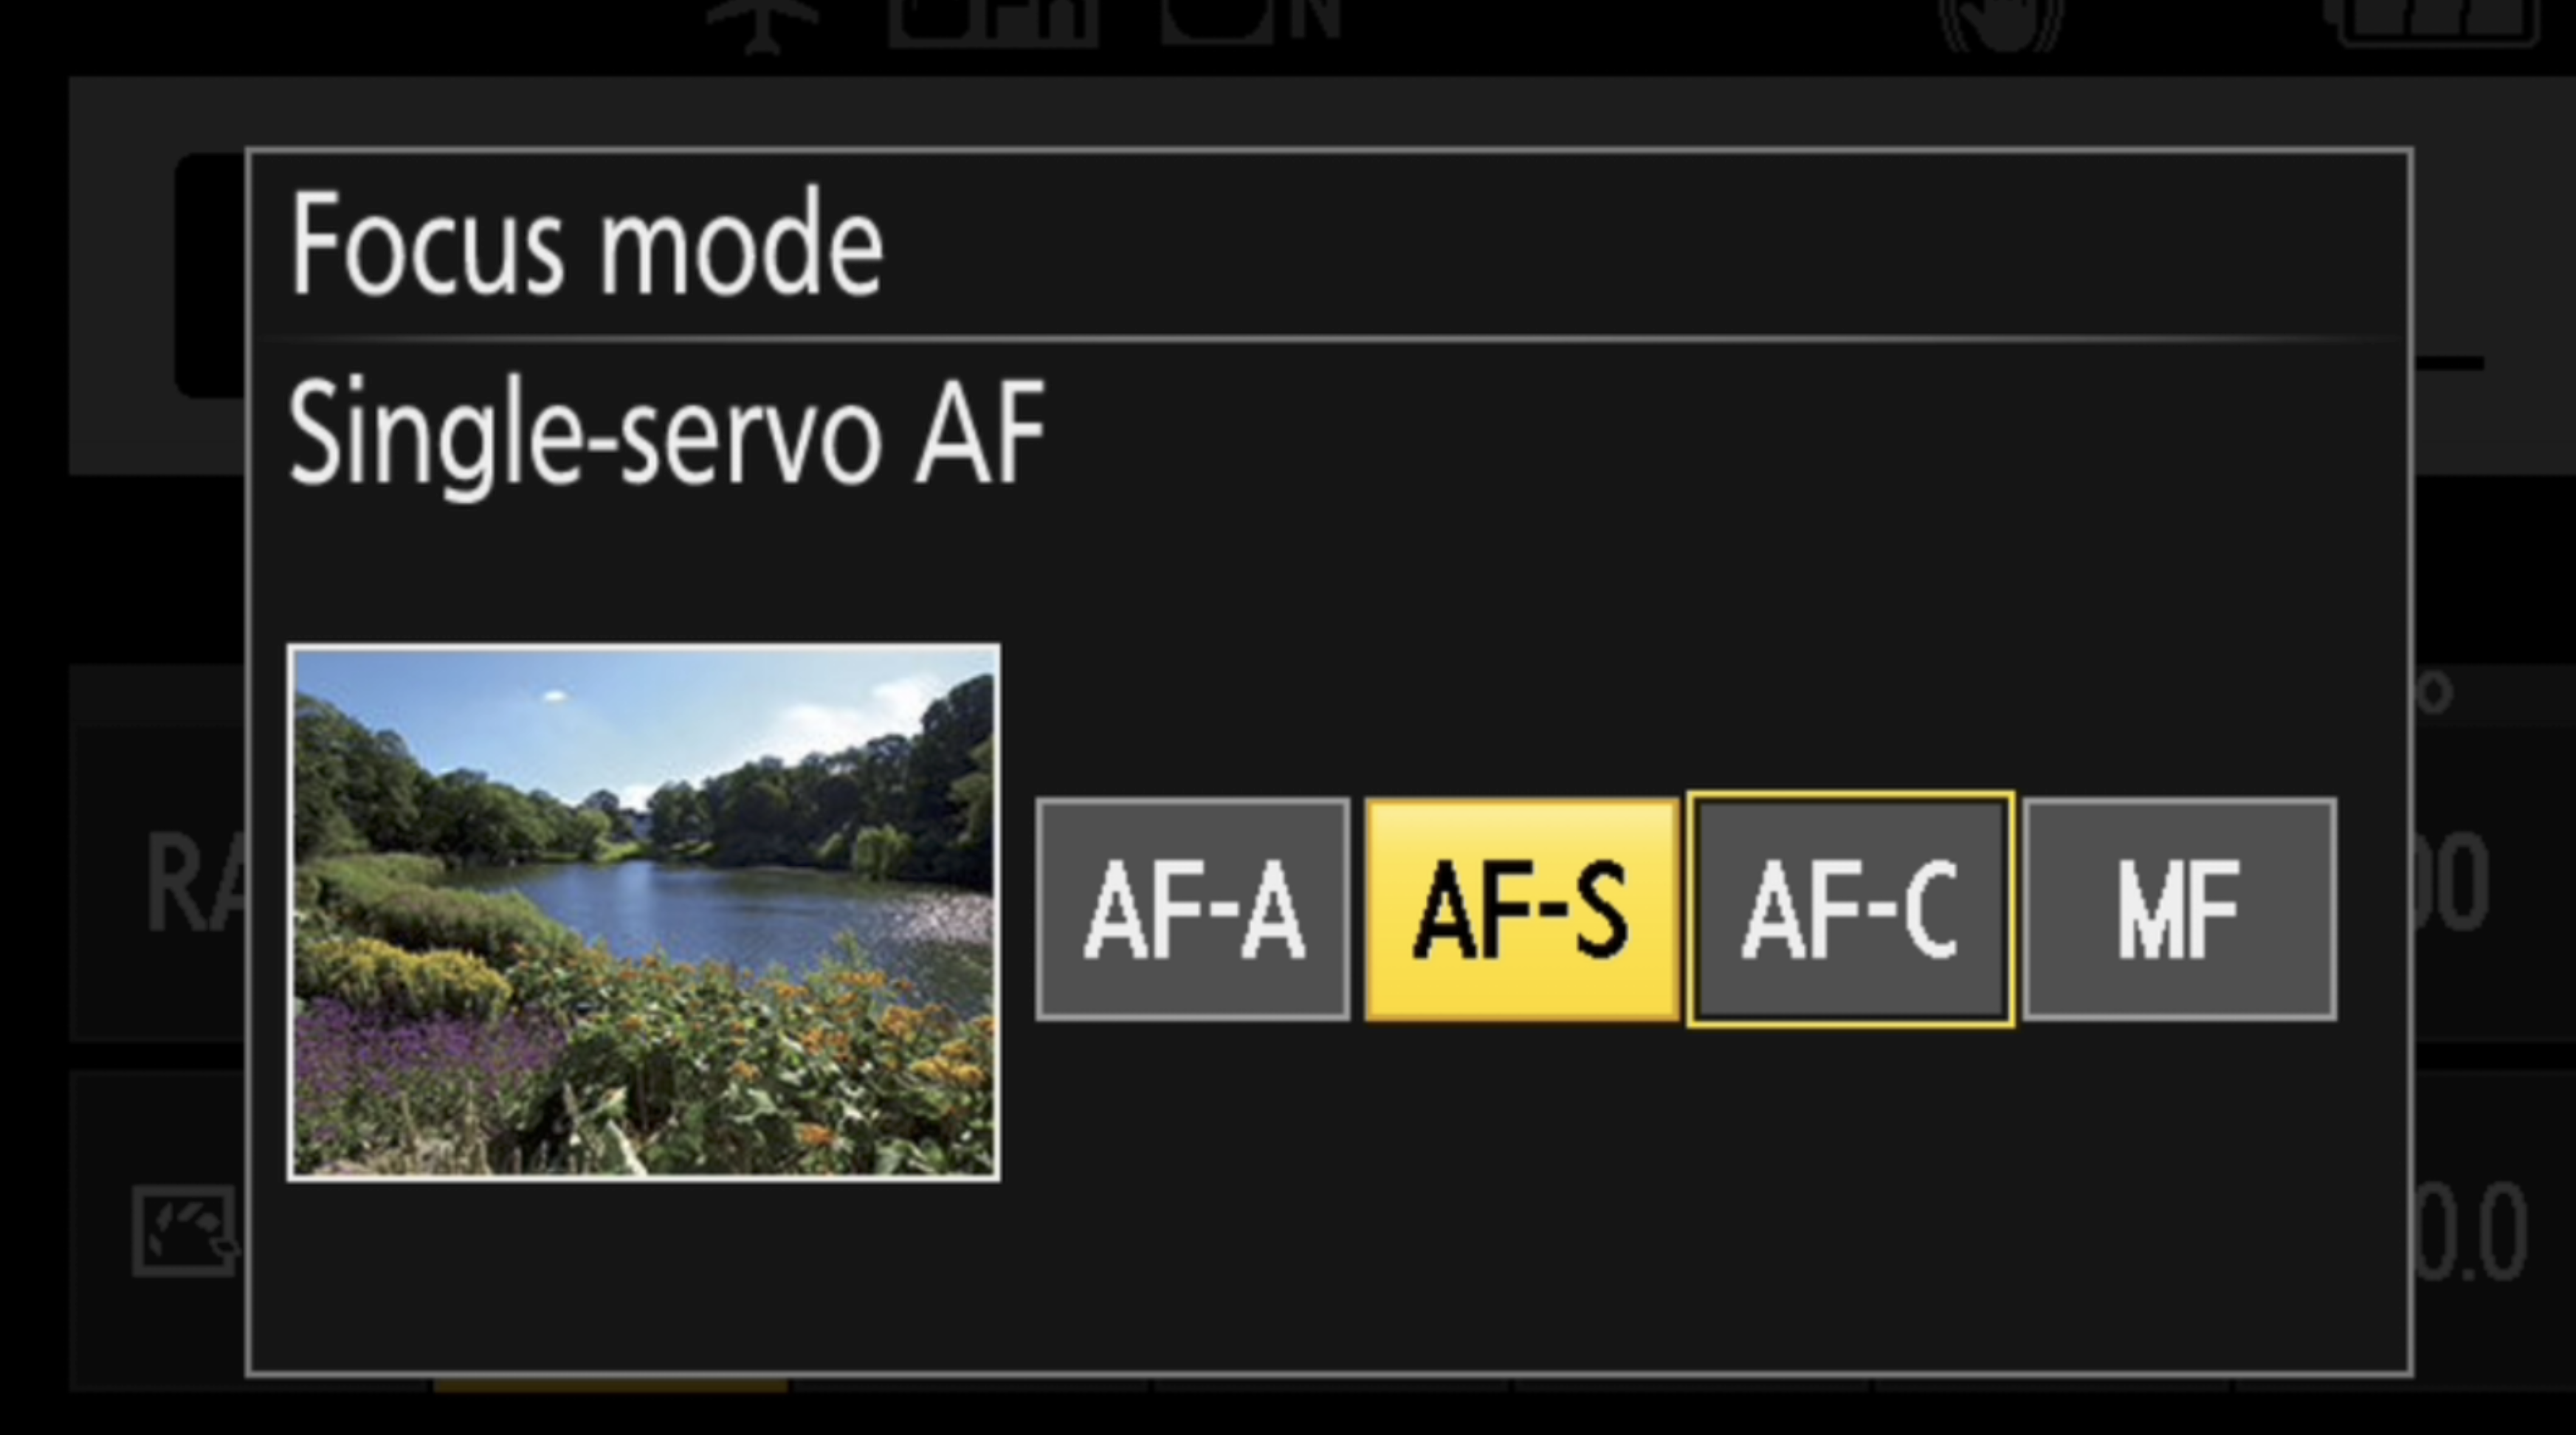
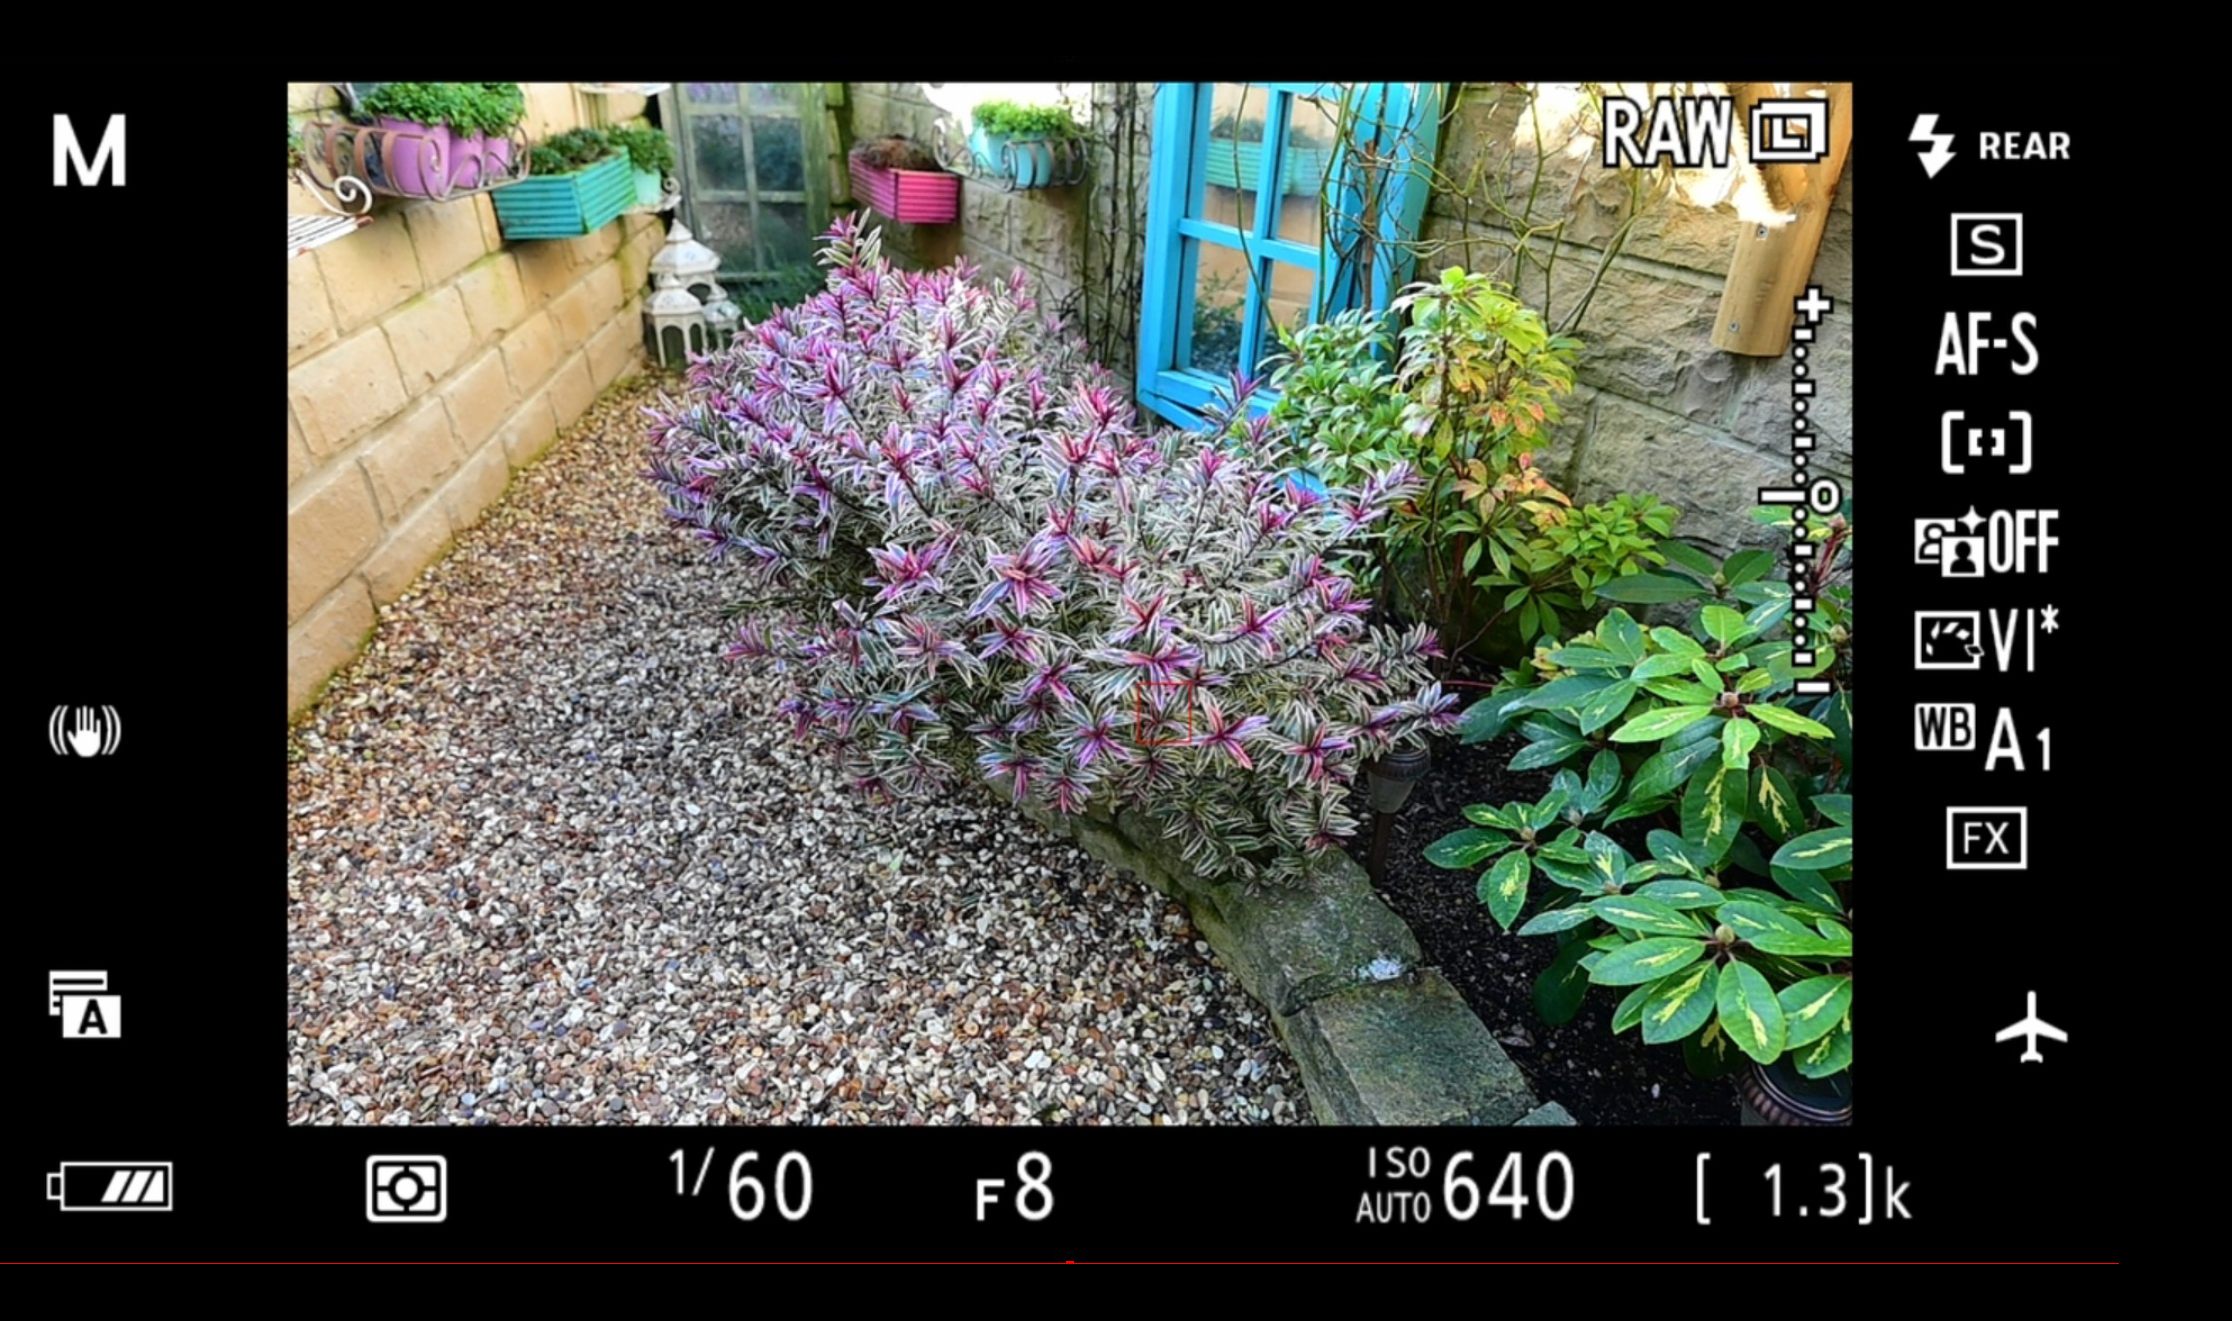
Nikon cameras use two AF systems to help you get it right:
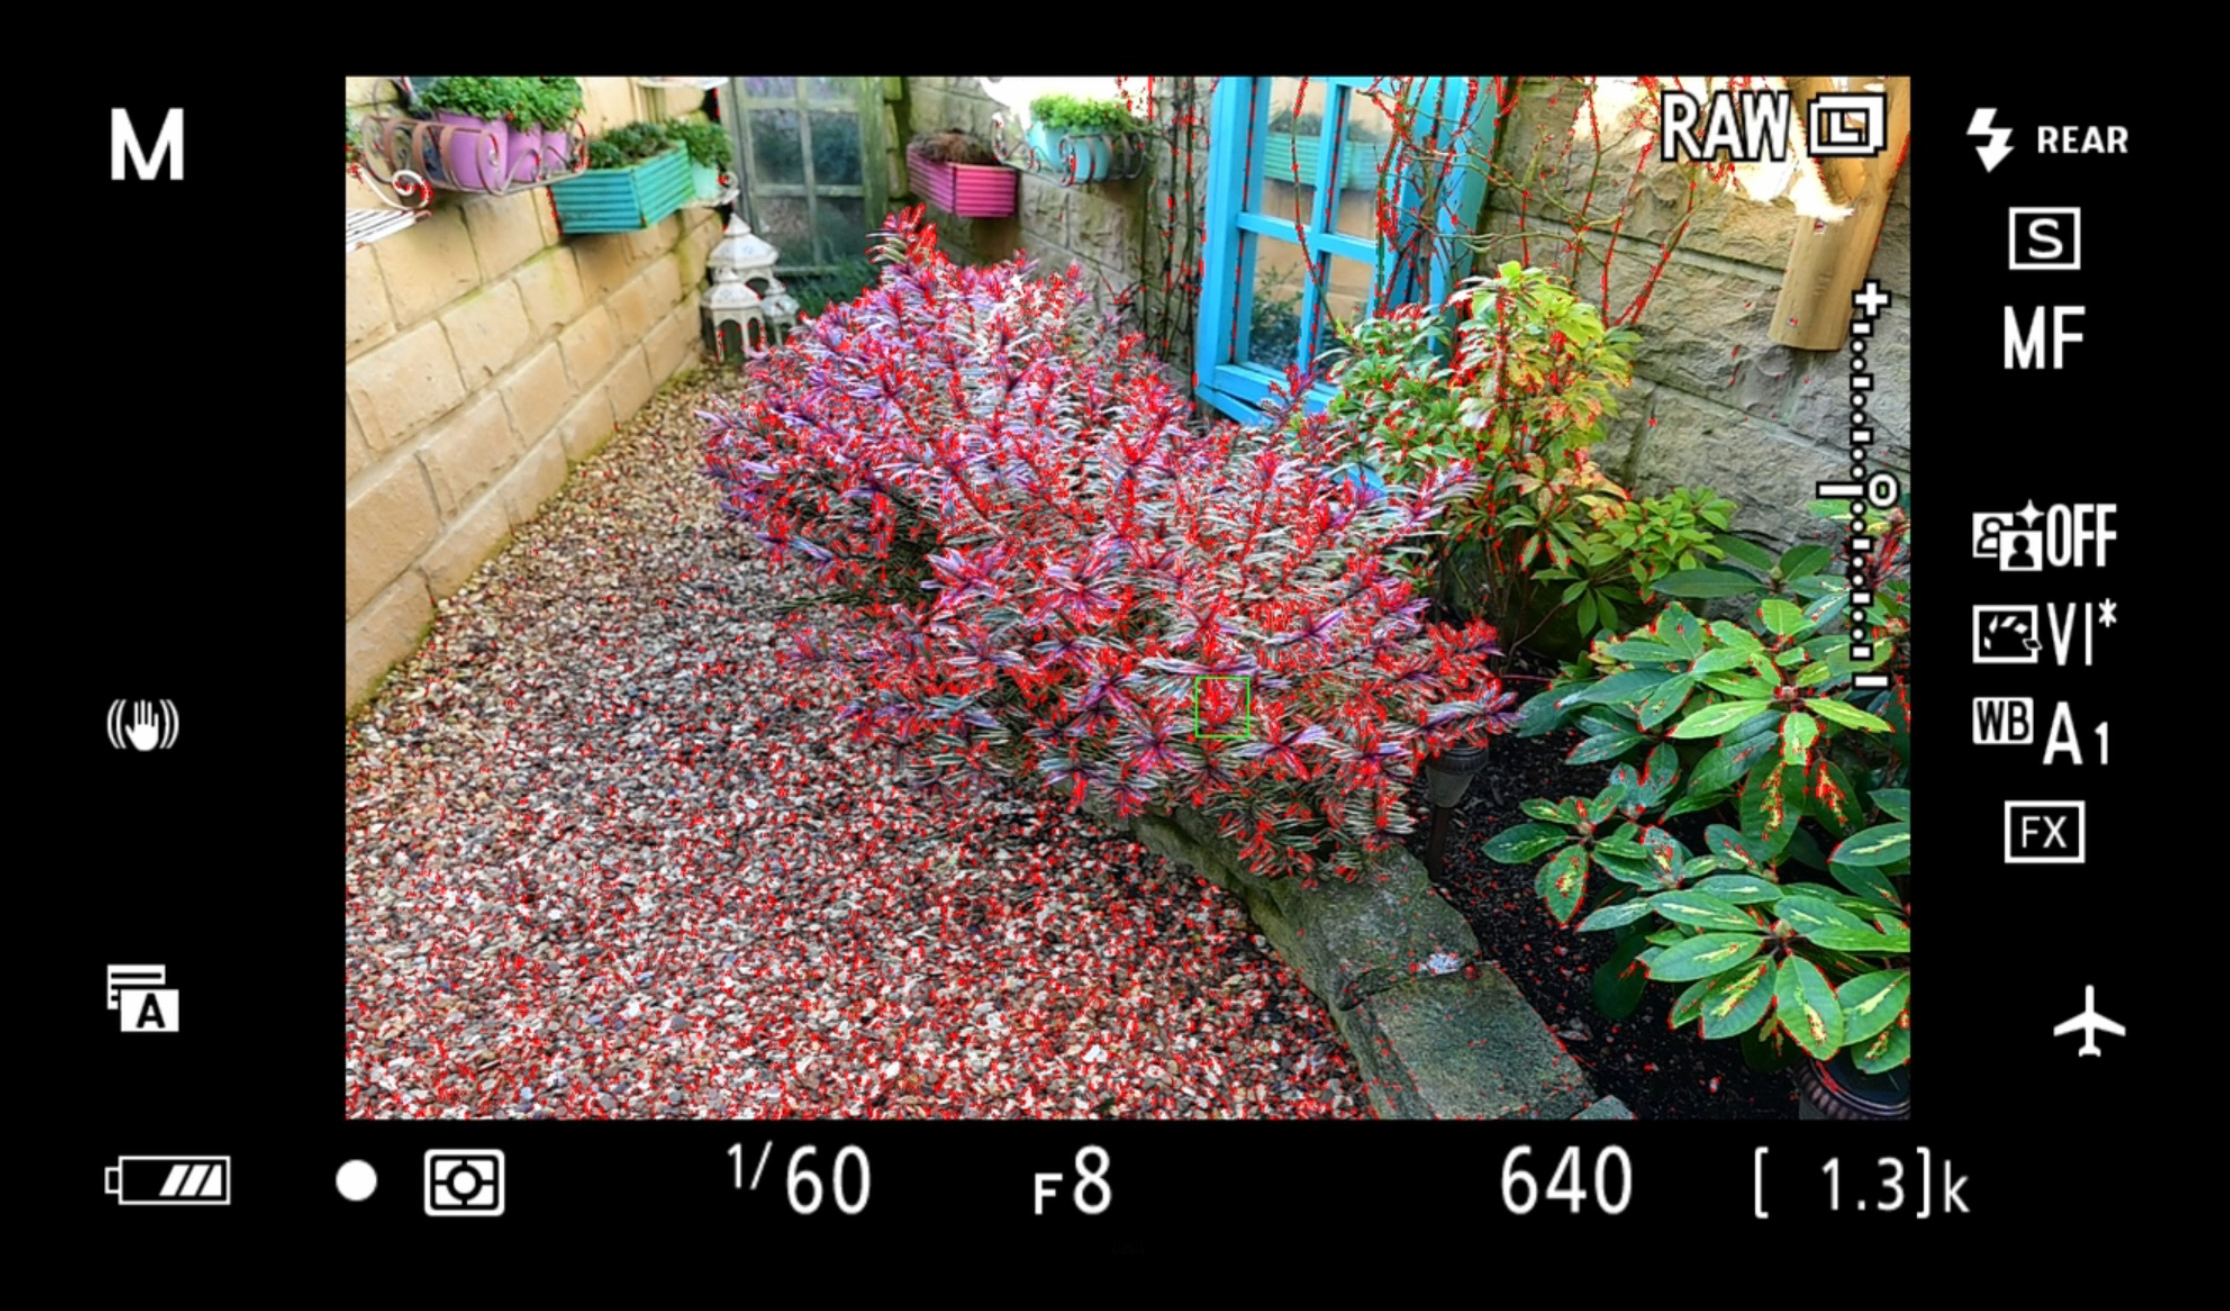
Contrast-detection AF – not surprisingly, this needs areas of contrast to confirm focus lock. It relies on software algorithms to examine the image for contrast and edge detail. The area under the focus point(s) is analysed and the data sent to the lens to rapidly change focus from the foreground to background until the subject is in focus. A subject that lacks texture, like a cloudless sky, has nothing for your autofocus system to lock onto, resulting in the lens ‘hunting’ back and forth trying to lock focus. On the other hand, areas of contrast that incorporate vertical or horizontal lines or strong edge contrast enable autofocus to work quickly and accurately.

Phase-detection autofocus – this uses micro lenses for focusing, and works faster than contrast-detection. When light passes through the micro lenses, it splits into a pair of images. The distance between these images is measured and compared to locate where the subject is, allowing the camera to tell the lens exactly where to focus.

With a DSLR, using the optical viewfinder activates a separate AF sensor to achieve focus using phase detection. This AF sensor also has a range of patterns which work with software algorithms to lock focus when also using contrast detect AF. The shape of the AF sensor dictates where the focusing points can be positioned, meaning that you can’t achieve full viewfinder coverage with an optical viewfinder.
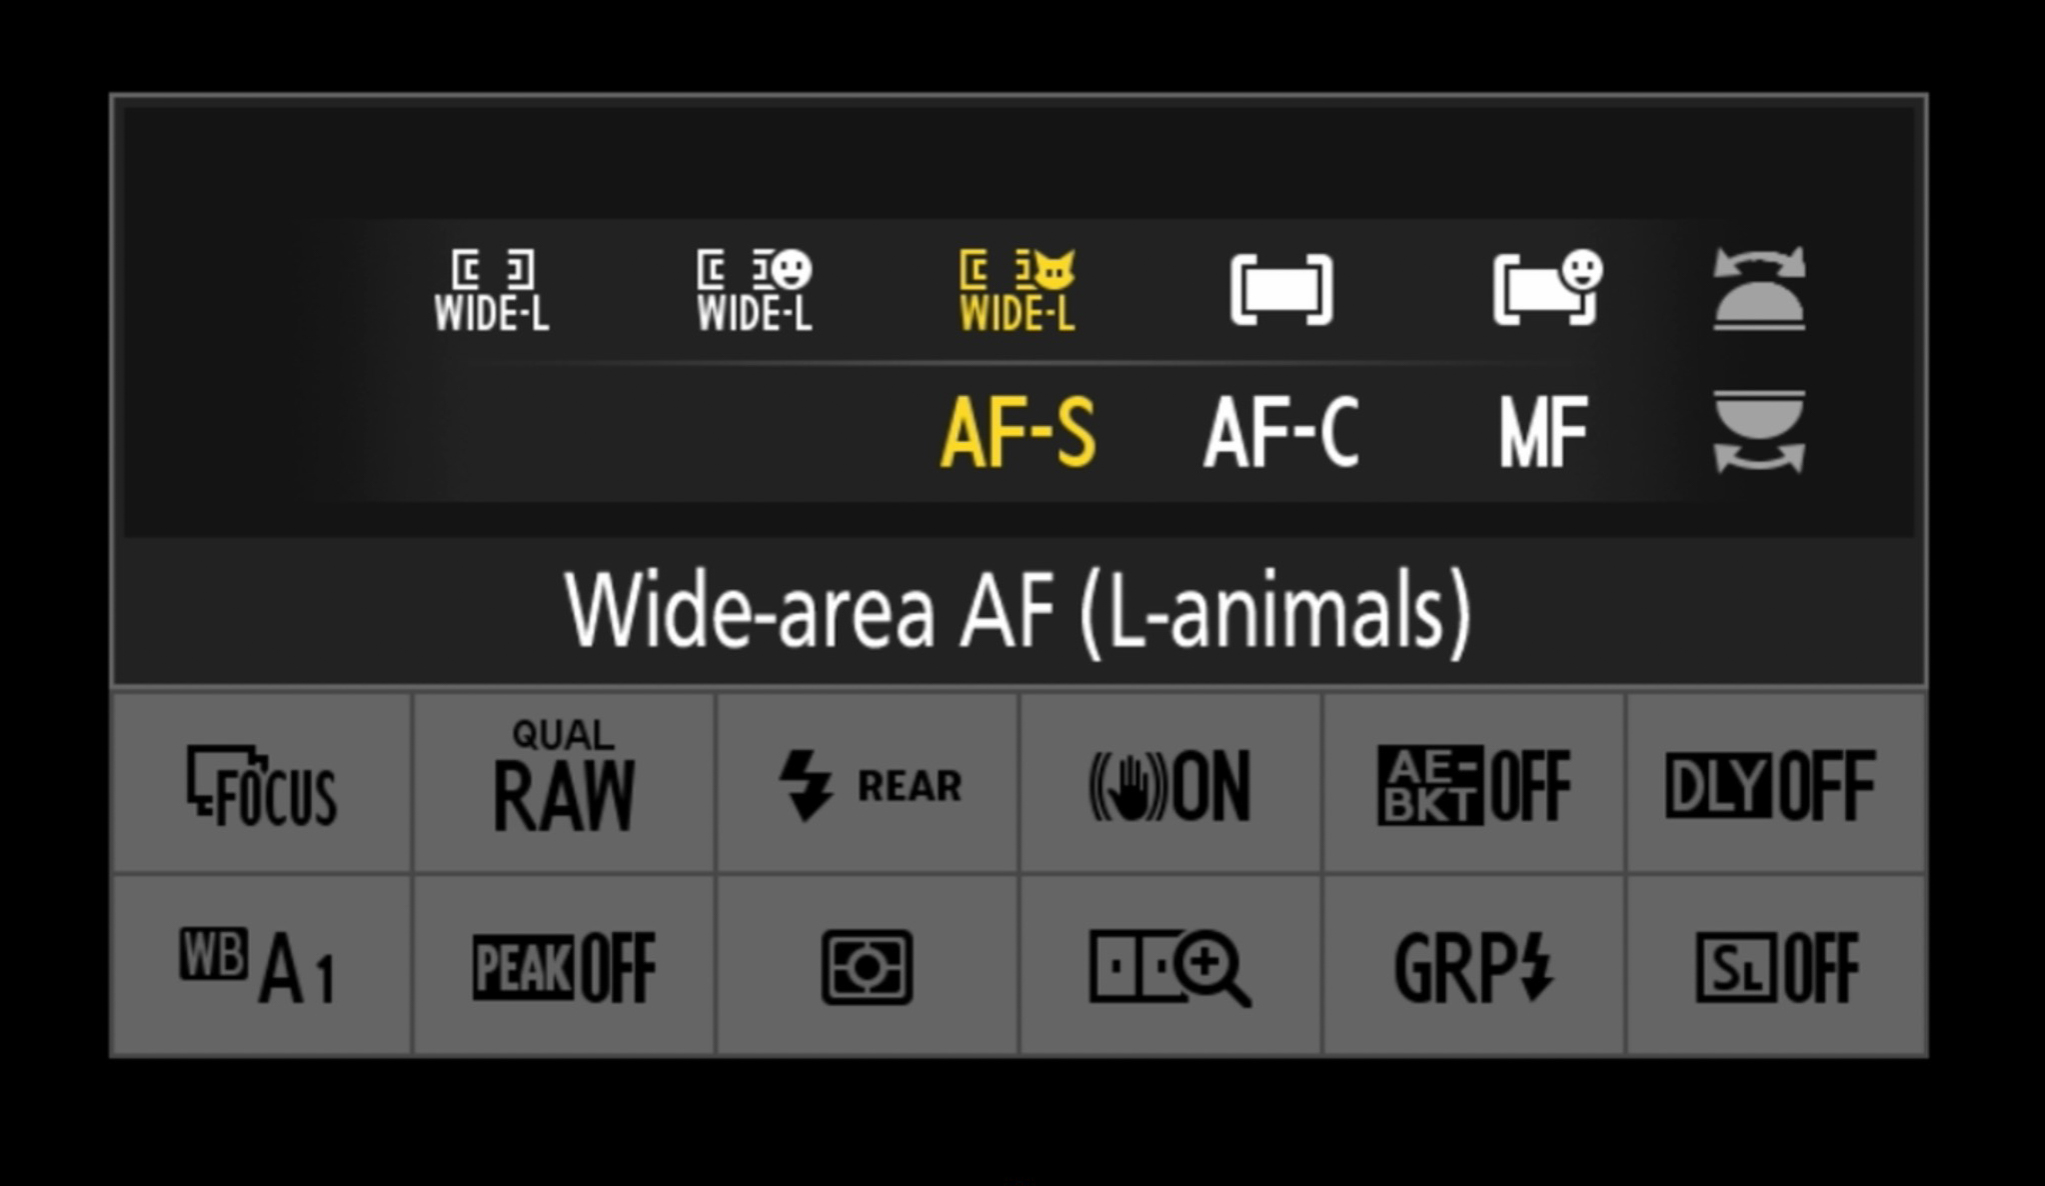
Mirrorless Z series cameras have the AF Sensor built into the imaging sensor. The image and focusing data from the sensor are sent to the electronic viewfinder enabling fast phase-detection AF for both stills and video. This design allows Z series cameras to have many more AF points than a DSLR.

But having a large number of focus points is only one part of a good focusing system. The type of AF points is also very crucial for getting accurate results. There are three types of AF points – vertical, horizontal and cross type. The more cross-type sensors your camera has, the faster and more accurate your autofocus system.

CHOOSE THE PERFECT AUTOFOCUS MODE FOR YOUR SUBJECT

On your Nikon camera, you have a choice of autofocus modes to ensure you get the optimal result, whether your target is stationary or moving.

Best for static subjects like landscapes –AF-S
AF-S (single-area autofocus) allows the camera to focus once on a subject a set distance away, and won’t refocus automatically if you or your subject move. Once you’ve achieved focus lock, the focus point will briefly flash green to confirm.

Best for tracking moving subjects, such as birds in flight –AF-C
To use AF-C (continuous autofocus), half-depress the shutter button (or AF-ON) to continually focus on the subject under the active focus point(s). The autofocus system will automatically adjust to keep your subject in focus, and the focus point stays red because the system is continually focusing.

Best for both moving and still subjects in the frame – AF-A
AF-A (auto autofocus) automatically switches between AF-S and AF-C modes, depending on the subject under the active focus point(s). If the camera thinks the subject is static, it switches to AF-S. If the subject moves, it changes to AF-C. High-end cameras don’t have AF-A, as there can be a delay when switching between the two modes, which could result in a shot being missed.
Best for shooting videos – AF-F
AF-F (full-time autofocus) automatically tracks subject movement and is constantly focusing during video recording. Use with Face / Eye tracking on a Z series camera for perfect focus.

Best for specific focusing requirements – MF
MF (manual focus) can help you target your subject more accurately in low-light conditions, such as for a tripod-mounted twilight shot, or with fast-moving subjects travelling down a predictable path, like a car on a race track. It’s also good for low-contrast subjects, where autofocus would struggle to focus – for example, where there’s little difference in colour between your subject and the background. Useful if you want to use focus peaking (more on that below) or have specific focusing requirements.

GET THE FOCUS SPOT-ON USING AUTOFOCUS AREA MODES

So far, so good. But, wonderful as all this is, the one thing your Nikon camera’s technology can’t do is read your mind. It doesn’t know where in the frame you want to focus, and its default position will be to lock onto the area of the shot that it’s closest to or has the highest contrast and detail. That’s where the autofocus area modes come in, to help you hit the sweet spot in the frame.

There are six AF-area modes on your Nikon DSLR:

Pinpoint uses contrast detection AF to precisely focus on a subject. The autofocus point is four times smaller than single point, so it’s very accurate but slow to move and only available in AF-S mode.
Single-point gives you a single focus point you can move around the entire focusing area. The sharpest part of your image will be the area under this single point and is best used on static subjects.
Dynamic is used for action and fast-moving shots and has many options, depending on your camera.. Set the number of focus points that will cover your subject, then track it by moving the camera.
3D tracking shows a single active focus point which ‘samples’ the colour underneath it and then tracks it automatically, allowing you to compose your shot while the subject moves. It’s best used with a subject that is a different colour to the background.
Auto area AF activates all focusing points and looks for the highest area of contract or closest subject to the camera to focus on. With it, you have no control over where or what the camera will focus on.
Group area uses five points to lock focus (although in the viewfinder you only see four). All five are activated simultaneously. It’s more accurate than dynamic AF, which only activates the additional focus points when the centre focus point fails to focus.

The Z series offer pinpoint, dynamic and single-point AF, as above, plus the latest generation of focusing modes, including:

Wide area (small), which increases the size of the focus area to make it easy to focus on bigger objects. Conversely, wide area (large) is useful when your subject is difficult to find in the scene and you need a large controlled focus area to work with.
Auto area looks for people or animal faces to focus on if you’re using a Z 5, Z 6 or Z 7. If you have multiple people in the scene, you can use the multi-selector to select the ones you want to focus on. If no faces are found, auto area instead locks onto the highest area of contrast or closest subject in the frame. It also has a subject tracking mode which is activated by pressing the OK button. When the white tracking box appears, position it on the subject you wish to track and press OK. The tracking box turns yellow and will now track that subject across the frame.
• There are also two modes exclusive to the Z 6II and Z 7II. Auto area (people/animal) looks for human or animal faces or in the AF area, which covers 90% of the frame. You can also choose which eye or face to focus on within the frame. Wide area (people/animal) autofocus can be used to set a specific area of the AF frame to search for humans or animals eyes to focus on.

CUSTOMISING YOUR AUTOFOCUS UP TO 11

You can change many autofocus options in the custom settings menu and autofocus sub-menu. The menu we’ve shown here is from a Z 7II. Not all cameras will have every feature listed and some menu items may be different, but this gives you an idea of the possibilities.

a1, AF-C priority selection This setting governs if the shutter can be depressed or not. With focus selected, the camera won’t let you shoot until it has a subject in focus. The release setting means you can shoot an image even if it’s not in focus. Release is the best setting for this mode.
a2, AF-S priority selection This should be set to Focus.
a3, focus Tracking with lock-on The Default mode is 3, which is fine for most subjects. If you’d like the camera to hold a subject in focus for longer and ignore objects that pass between you and the subject, then set it to 5. If you want your camera to jump quickly from subject to subject , set this to 1.
a4, focus points used The ‘ALL’ setting allows you to move your focus point to every selectable point within the frame. ‘1/2 every other point’ halves the number of points you can select from, which means you can move around your focus points more quickly, but potentially reduces your focus options and accuracy.
a5, store points by orientation If set to ‘Yes’, this will maintain the focus point position when you move the camera from horizontal to vertical or vice versa.
a6, AF activation These are the settings for back button focusing. ’Shutter / AF-ON’ enables both the shutter and the AF-ON button to focus. ‘AF-ON’ means that only the AF-ON button will focus.
a7, limit AF-area mode selection Limits the focus modes which are displayed when scrolling through the focusing menu. Use the multi-selector to select which modes to display.
a8, focus point wrap-around Set ‘Wrap’ to allow your AF point to wrap around the focus area and appear on the opposite side. The same occurs with up and down movement.
a9, focus point options Manual focus mode will determine if the active focus point illuminates when in manual focus mode. Dynamic-area AF assist gives you options for selecting how the focus points are displayed when using dynamic focusing modes.
a10, low-light AF Exclusive to Z series cameras, this enables more accurate low-light focusing when using single point AF. The suggested setting is ‘ON’.
a11, built-in AF-assist illuminator This activates the AF-assist illuminator to light up subjects in low-light environments helping the camera achieve focus lock.

USING BACK BUTTON AF SO YOU NEVER MISS A SHOT

Using the shutter button to both focus and shoot means that every time you press it, you lose focus for a short time until you ‘half’ depress it again. Even though Nikon cameras acquire focus quickly, you’ll still end up missing a few images in a fast-changing situation.

To get round this, you can assign the focus function to one of the buttons on the back of the camera, reserving your shutter button purely for capturing the image. If your camera has one, use the AF-ON button for back button focusing, otherwise assign the AE-L / AF-L or another programmable button to do it. Back button focusing can be used with either AF-S or AF-C modes.

Back button AF gives you an advantage when tracking moving subjects. If you keep the assigned button pressed down in AF-C mode, you are now constantly focusing on the subject under the active focus point(s), even when you press the shutter button to shoot a sequence of images.

SIX STEPS TO LIVE VIEW SUCCESS

You can focus with the viewfinder or with Live View – each has its own advantages and uses separate focusing technologies inside the camera. Using Live View enables critically-sharp focusing when you’re shooting on a tripod, so it’s ideal for macro, product imaging and landscapes. Here’s how to do it:

1. Switch to Live View (LV) or turn on the LCD screen.
2. Compose the image using the LCD display.
3. Press the + button to zoom into the image. Use the multi-selector to move around your image.
4. Focus using either manual or autofocus. If using autofocus, use back-button focus, otherwise switch your lens to manual focus to stop the camera refocusing when you press the shutter button.
5. Press the - button to de-magnify the image and return to the main view of the scene.
6. The result: extremely accurate focus on a tiny part of the overall image.

GETTING PEAK SHARPNESS WITH FOCUS PEAKING

Focus peaking helps you to focus accurately and also shows the area of acceptable sharpness within your image. It’s activated when you switch your lens or camera to manual focus.

• On a Z series or the D780, focus peaking is in the custom settings menu and the ‘d Shooting/display’ menu under ‘Peaking Highlights’. Set the sensitivity to 2, then choose a peaking colour. Red or blue usually stand out well.
• On a D850, first switch to Live View, then press the i button and scroll through the menu on the right-hand side until you see ‘Peaking’.

Either way, as you manually focus the lens, areas in focus are outlined with the peaking colour you selected. In effect, you’re seeing real-time depth of field for your image, which makes focusing very simple.

FOUR TIPS FOR BETTER LOW-LIGHT AUTOFOCUS

When light levels drop, so does contrast, and this means your camera can struggle to autofocus – so it’s time to give it a helping hand.

1. Use the centre-focus point as this is a cross-type AF sensor.
2. Use the Low Light AF illuminator feature. You also need to select AF-S. On a Z series enable Low-light AF as well.
3. Focus on subjects that have contrast or focus on the edge of a subject.
4. Camera shake is often confused for poor focusing, so to minimise it when shooting handheld, aim to keep your shutter speed to around the reciprocal of the focal length – and double it if you’re using a high megapixel sensor. In-camera image stabilisation and VR lenses help you achieve sharp images at lower shutter speeds.

Want to read offline?

You can now download a PDF version of this Hints & Tips article to read offline and print

DOWNLOAD

NIKKOR Lenses
NIKKOR Lenses