Welcome to Nikon School. The official Nikon education experts to help you learn how to get the best from your Nikon Camera and Lenses

Your essential guide to exposure

Want to ensure every exposure is spot-on? Focus on these expert tips from Nikon School Manager Neil Freeman.

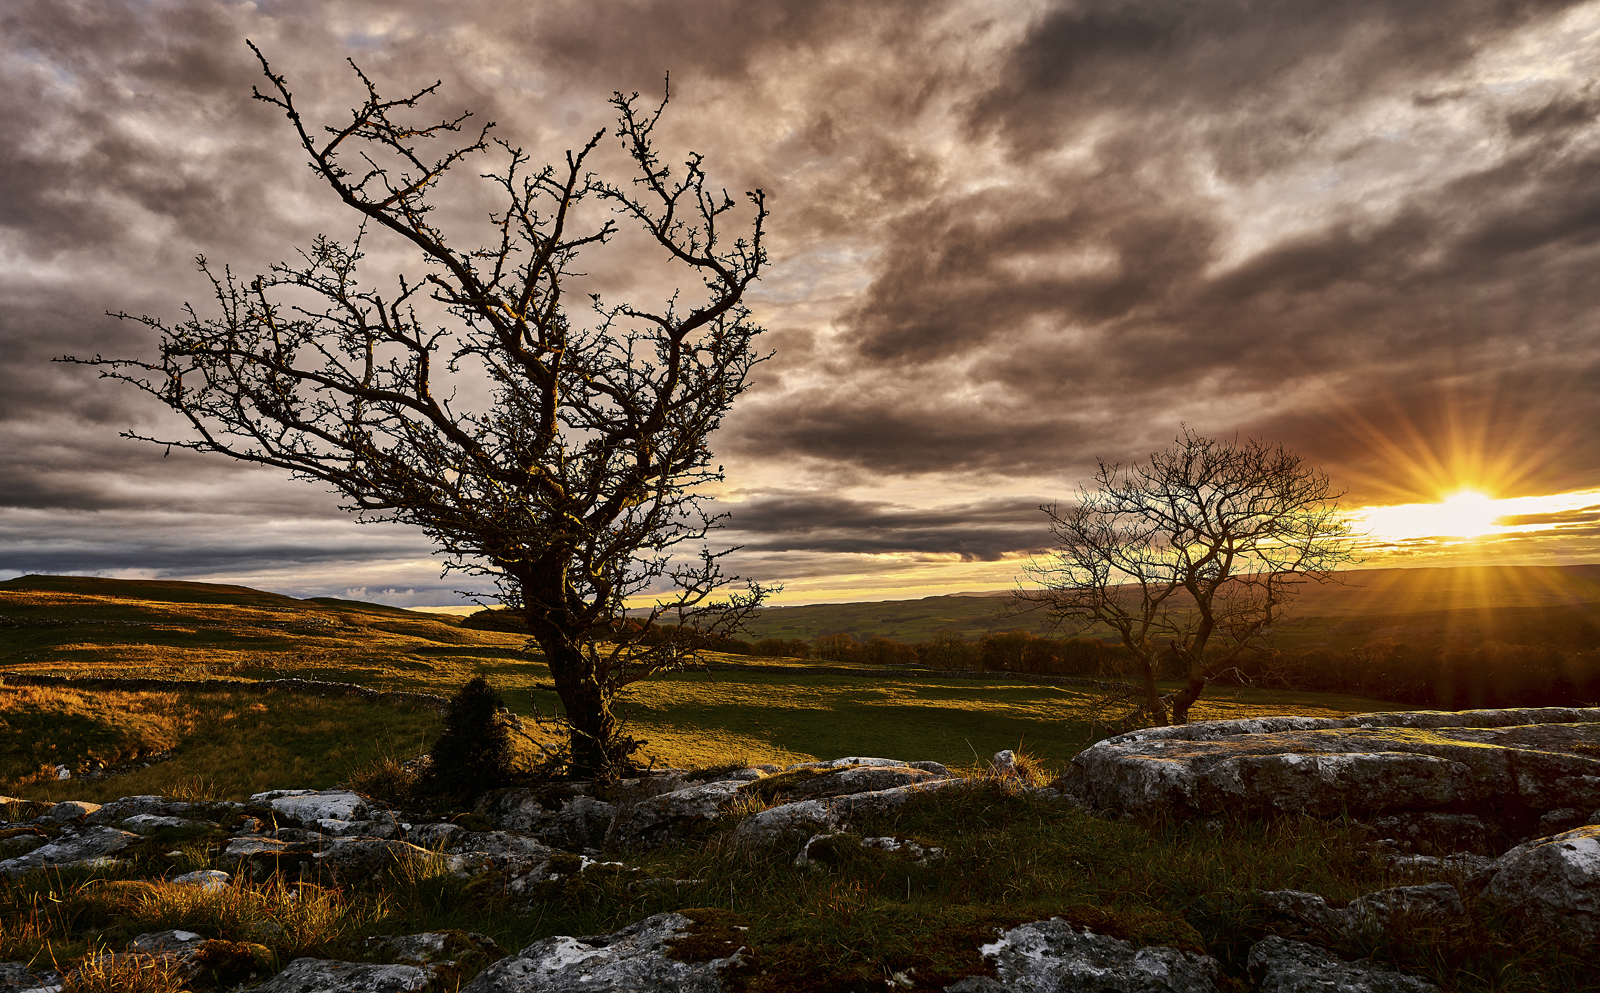
To create a photographic image, we expose a light-sensitive substrate (formerly film, now your digital camera’s sensor) to a controlled amount of illumination. A good exposure involves ensuring a balanced amount of light reaches the sensor for each image. The challenge is that light levels vary and often change unpredictably, unless you’re shooting in a controlled studio environment.

In this Nikon School guide we’ll be looking at all the factors that go into creating an excellent exposure for every shooting situation, starting with three essential controls. No matter what camera you have – a D3500, Z 7II or D6 – you use the same three controls to determine the exposure in your image. Together, these are sometimes known as the exposure triangle.

1. The exposure time or shutter speed sets the length of time light hits the sensor. The longer (i.e. slower) your shutter speed, the more light the sensor receives; the shorter (i.e. faster) the shutter speed, the less light gets through to the sensor.

2. Your chosen aperture will also affect how much light reaches the sensor. A larger aperture (lower f-number) such as f/1.8 lets in plenty of light but results in a narrow depth of field. Smaller apertures (higher f-numbers) such as f/11 allow less light in but give a wider depth of field.

3. ISO is the third control for balancing the light. When you change the ISO, you alter the amplification of the signal-to-noise ratio on the sensor. In simple terms? The sensor becomes more or less sensitive to light. At lower ISO values, the sensor is less sensitive but usually produces the best quality images, as these are often the baseline (‘native’) ISO settings a camera has been designed to operate at. The higher the ISO, the more sensitive to light the sensor becomes, but it tends to yield a lower quality image, especially as you get into the extendable ISO range.

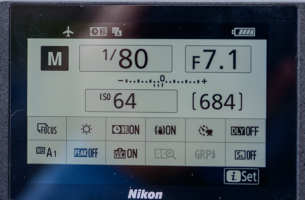
Depending on the shooting mode, your initial aim is getting the exposure meter ‘into the middle’. If you’re shooting in Program, Aperture or Shutter Priority or have Auto ISO turned on, this should happen automatically (unless you’re working in extreme light conditions), and the exposure bar won’t be shown because everything is working as designed.

However, if you’re using manual mode and setting the ISO manually, you’ll have to balance the creative choices of shutter speed, aperture and ISO with the need to balance the exposure meter. How you approach this depends on the subject you’re photographing. Auto ISO with manual mode is a good solution – it allows you to set an upper limit for the ISO that you’re happy working with, then while you select the shutter speed and aperture, the camera automatically adjusts the ISO up to that ceiling.

Now that your shutter speed, aperture and ISO are set, the metering system will assess the light coming into the camera and help you achieve a balanced exposure in most situations. One of the major benefits of a mirrorless camera is that you see the exposure in real time through your electronic viewfinder (EVF) or on the monitor screen.

After taking your picture, review it on the LCD or in the EVF to see if you like the results. You can also use the histogram display to check your exposure’s accuracy but remember that it’s the histogram of your JPEG thumbnail on the screen, not the histogram of the RAW data (with its wider dynamic range in it) that you will be editing.

Once you’ve mastered balancing the exposure on every shot, it’s time to experiment with creativity and deliberate over/underexposure of your images with exposure compensation to develop your photographic style.

NEED-TO-KNOW CONTROLS AND SETTINGS

Shutter speed
The rear command dial on Nikon DSLRs and Z series cameras sets the shutter speed. Depending on your camera, you have a range from 1/8000sec to 30” (seconds) for maximum control of motion and exposure in the image. On the D780, D6, Z 6 & Z 7 II you can go to 900 seconds in Manual mode using the Extended Shutter Speeds option in the custom settings menu.


Aperture
This is controlled by the front command dial if your camera has one. When shooting in Aperture Priority Mode with a D3400, D3500 or D5500, D5600 series, use the rear command dial for aperture control. In Manual mode on a D3400, D3500 or D5500, D5600 camera, the shutter speed is set by the rear command dial. Aperture control is also found on the same dial, but you need to hold in the exposure compensation button at the same time to access it.

ISO
On most cameras this is set by holding the ISO button and rotating the rear command dial. Turning the front command dial while holding the ISO button is a shortcut for activating Auto ISO. If you don’t have an ISO button, use the photo shooting menu (camera symbol) or the ‘i’ menu to set the ISO instead.

Custom setting ‘b’ menu
In the Metering/Exposure menu, ensure the ‘EV steps for Exposure Cntrl’ is set to 1/3. This selects the steps used when adjusting shutter speed, aperture, and bracketing at 0.3 EV increments, allowing you more accurate exposure control.

Exposure lock
With a DSLR, you may need to frame a subject outside the viewfinder focus area. To do this, press and hold the Auto Exposure Lock (AE-L / AF-L) button while half depressing the shutter to lock the exposure value from the scene. You can now move your camera to reframe the composition. Make sure you move your camera parallel to the subject so you don’t affect the depth of field.

Real-time histogram display
With most DSLRs, in Live View mode you can see a real-time histogram by repeatably pressing the ‘i’ button. On a Z series camera, press the DISP button to move through the various displays until you reach the histogram, which can be shown on the monitor or in the EVF.

Image histogram
To display the histogram of the image you’ve just taken, go to the Playback menu, then Playback Display Options. Now tick the box next to Overview (this might be on the second page of options). When reviewing your images, press the multi-selector up or down to scroll between your display options. The overview screen will now show you the image metadata and the histogram for the image. Remember you are seeing a JPEG histogram and you’ll have more data in your RAW Histogram.

Exposure compensation
Use this to fine-tune your exposure in Program, Aperture and Shutter Priority modes. It only works in Manual Mode if you have Auto ISO set to On. Hold down the exposure compensation button and rotate the rear command dial to alter the compensation applied to the image.

ACTIVE D LIGHTING

1. Active D Lighting stands for Active ‘Dynamic’ Lighting and is found in the photo shooting menu (camera symbol). It’s used when you have a high-contrast scene and want the camera to balance the exposure between the shadows and highlights. Active D lighting only affects your JPEG images – it doesn’t work on your RAW files.

2. Depending on your camera, you’ll generally have an option for just ‘On’ or ‘Off’, although some cameras have a range of settings such as Auto, Low, Normal, High and Extra High. Active ‘D’ lighting lifts shadows and recovers highlights in the exposure. Setting Auto, Low or Normal will only have a subtle effect on your image.

3. Using the High or Extra High settings will result in a much bigger exposure change to your image, as long as you’re photographing a high-contrast scene. In some images this can almost have the effect of using a graduated neutral density filter to help retain highlights in the sky.

EXPOSE TO THE RIGHT

1. To get the most technically correct exposure with the most detail from the sensor, expose to the right (ETTR). This technique builds on the fact that camera sensors collect more information in the highlights (on the right-hand side of the histogram) than in the shadows (on the left).

2. When shooting with ETTR, the aim is to get the histogram biased about 60-80% towards the highlights without clipping any of their detail. This probably means you’ll have to slightly overexpose the image by up to +1 EV, although this is subject-dependent.

3. Use the histogram in Live View mode or via the monitor screen on your Z series as you’re setting the exposure for your image to gauge how far you can push the histogram for a given scene. ETTR will not be appropriate for every image you shoot.

4. You might need to pull back the exposure in post-processing to produce a less bright image. ETTR gives more detail in the final image than in an underexposed image that’s been lifted to the correct exposure (as lifting it results in more noise).

USING EXPOSURE BRACKETING

Not sure which exposure is going to be the right one? Use exposure bracketing to find out. It can be applied to any subject, but you’ll get the best results if you shoot something with a wide range of colours and tones. Static scenes are also preferable, as any movement means the images can’t be used for exposure blending in post-processing as it will give ‘ghosting’ in the final image. So, while it’s possible to exposure-bracket when handholding the camera, a tripod will guard against movement, particularly at slow shutter speeds, and it will also help make sure each shot is framed identically.

• On most Nikon DSLRs you have a BKT button. Hold this button in and rotate the rear command dial to set the number of shots in the sequence. This can range from 3 to 9, depending on your camera. Using 3F or 5F can produce good results.
• Still keeping the BKT button depressed, use the front command dial to set the EV increment between each image. This can be anything from 1/3 EV to 2 EV. Some cameras also allow you to set a positive exposure sequence for brighter images or a negative sequence for darker images. If you don’t have a BKT button, you can ‘bracket’ by setting exposure compensation values for each shot. Exposure bracketing on Z series cameras is found in the photo shooting menu under Autobracketing.
• Now you’ve taken your bracketed sequence of images, check the results to see the difference between the bracket exposures – although you’ll be able to see even more shadow and highlight detail when you check them on your computer screen.
• The most important part of exposure bracketing is ensuring that you set it back to 0F once you’ve finished shooting, otherwise the camera will continue to exposure-bracket everything you shoot.

Camera sensor technology has come a long way in recent years. On a D850 or Z 7 II, you can achieve a dynamic range of around -5 EV to + 3 EV, so it’s possible to take a RAW file and create a bracketed sequence from that single image in post-production. This can be a better option than shooting the sequence in-camera, which will allow movement in the image.

Another use for exposure bracketing is HDR (high dynamic range) photography or exposure blending multiple images in post. Again, if you have a good camera with a wide dynamic range, these techniques are no longer needed as you can use the shadows and highlight sliders in software editing packages to create an HDR image from a single RAW file.

STOPS VS EXPOSURE VALUE (EV)

• ‘Stops’ and ‘EV’ are both ways of talking about the light used to calculate exposure settings. Photographers will often refer to increasing or decreasing exposure by a stop. More recently, the term EV (exposure value) has also gained prominence. Referring to either is fine.

• EV represents the different combinations of shutter speed, aperture and ISO value that comprise an image’s exposure setting. For example, 1/125sec at f/5.6 or 1/1250sec at f/1.8 will both give balanced exposures at ISO 100 with the same amount of light reaching the camera’s sensor.

• When you’re using exposure compensation or exposure bracketing and flash exposure compensation, EV is used to change the exposure between two or more images. A change of 1 EV (one stop) doubles or halves the amount of light admitted, depending on whether you’re adding positive or negative exposure compensation. This makes a big difference to the exposure of your final image.

HOW TO USE EXPOSURE COMPENSATION TO FINE-TUNE YOUR EXPOSURE AS YOU SHOOT

1. Exposure compensation button This is located on top of the camera. On D3xxx and D5xxx series cameras you can also use the ‘i’ menu and multi-selector to set exposure compensation.

2. Shooting modes Exposure compensation only works in Program Auto, Shutter Priority, Aperture Priority. If you’re in Manual mode, exposure compensation only works when Auto ISO is set to ON.

3. Display settings Holding in the exposure compensation button and rotating the rear command dial will now show the changes on the top LCD display or rear monitor, depending on which camera you have.

4. Compensation values You can choose to add compensation in 1/3 EV stops. You have a range from -5 EV to +3 EV, which should allow you to balance your exposure in most situations.

5. Fine-tuning Once you’ve set your compensation level, take a shot and review it. Change the exposure compensation levels if you need to fine-tune the exposure to get the perfect level.

6. Reset to zero When you’ve finished photographing the scene, remember to reset the exposure compensation value back to 0, otherwise it will be applied to every other image you shoot.

CREATIVE VS TECHNICALLY CORRECT EXPOSURES

Every time we shoot, we aim to have a correct technical exposure for our images. Nikon cameras make this easy to achieve for the vast majority of images. However, photography is a creative subject. Your personal shooting style is also important, so sometimes not having a ‘technically’ correct exposure and aiming for a ‘creative’ exposure is fine if it gets you the image you want.

Perhaps you prefer slightly more atmospheric images with a low-key look which lend themselves to richer colours. This means you’d be technically underexposing your image but getting the correct ‘creative’ exposure for your shot. Conversely, if you like brighter, high-key images, you’d be technically overexposing your images by maybe 1/3rd or 2/3rd of a stop to get the creative look you want. Different approaches suit different subjects.

If you have a Nikon camera with scene modes – such as a D5600 – some of these are designed to deliberately produce a low- or high-key look without you having to apply exposure compensation. For example, the beach or snow modes preserve the light, bright feel of coastal or snow-covered environments. On the other hand, sunsets and silhouette modes produce deep, intense colours.

Want to read offline?

You can now download a PDF version of this Hints & Tips article to read offline and print

DOWNLOAD

NIKKOR Lenses
NIKKOR Lenses