• A handy way of anticipating a promising sunset is to look at the clouds: high, spotty clouds with lots of space between them are ideal, as each separate cloud will grab a little bit of light and colour and create a visually pleasing scene. Sheets of clouds are not a good sign! Another indication of a decent sunset is often a rainy day – if the rainclouds start to clear around sunset, you could be onto a winning shot.
• With any sunset shot, you've got to react quickly – you'll have maybe 20 minutes to make something happen, and from one minute to the next the photo can be dramatically different because of the way the light reflects off different things and how its intensity changes. The key is setting up in advance, because if you're mucking around with your tripod legs you're likely to miss the best of it.
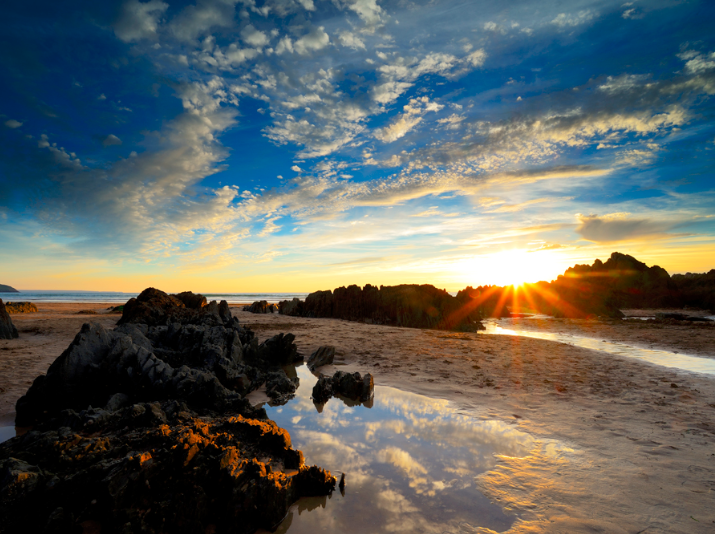
• To produce really effective, dramatic sunset images, you usually need more than just the sunset – you need foreground subjects in frame, whether they are shapes, shadows, details or textures, while clouds and birds in the sky can also be helpful for adding depth and interest, and bringing the scene to life.
• You'll be typically using an exposure of over a second, so you want to avoid camera shake as much as possible, which means using a tripod plus a shutter-release cable or the camera's self-timer. As the light fades you'll find that you gradually need longer shutter speeds. Keep reviewing the photos on your screen and via the histogram (see below), and increase the exposure time for the next shot if necessary. For silhouetted foreground details, however, crank up the shutter speed, but don't overdo how much silhouetted detail you include, as too much can overwhelm the image with its blackness.
• While the sun is still in the sky, set aperture priority (mode A on the camera), auto ISO if you are shooting handheld and the camera should then produce a balanced exposure for you as the light fades from the sky. At sunset, with the light changing so fast, if you use manual (mode M) you will need to continually adjust your camera settings to maintain a good exposure and this reduces the time you have to evaluate the light and composition for your image. If you need a slower shutter speed, you can either use a Neutral Density filter or go for a smaller aperture i.e. f/11 or f/16. A low ISO of 64 or 100 will also allow for a higher quality image and slower shutter speeds as well.
For twilight or blue hour and once the sun has disappeared, if you are still shooting in Aperture priority mode you may want to use the exposure compensation feature in your camera to fine tune your exposure to ensure it is correct. Alternatively, to give you complete control over your exposure, moving to manual (M mode) will give you even more control over your shutter speed and aperture settings.
To ensure that you achieve pin sharp images in low light situations, you have the choice of using Autofocus or Manual focus. With Autofocus, in a low light situation using the central focus point will enable you to focus more quickly. If you are still finding focusing to be a challenge, switch to manual focus on the lens and camera body, activate Live View and then either use the touch screen or plus button to magnify the image on your LCD display and now rotate the manual focus ring on your lens until the subject becomes pin sharp. A third option would be to pre-focus your lens on your subject while it is still light and lock the focus.
• If you want to include lights in a twilight scene, such as from lit-up buildings or street lights, take care with metering – low light can trick the meter into setting a longer exposure time to brighten up the large proportion of dark areas in the scene, but this will result in the lit parts being over-exposed and burning out. Use exposure compensation to manage this – you'll probably need a couple of stops of underexposure if most of the scene is dark. Underexposing slightly in sunset scenes will boost the colours, too.
• Make sure your settings are right by not only checking your image on the LCD but also checking the histogram. The histogram is a graphic representation of the range of tones in a photo – an instant analysis of the picture you've just taken – and with a sunset shot it'll tell you if immediately you're overexposing and getting burned-out highlights. Look for highlight clipping – a heavy concentration of jagged peaks on the right side of the histogram. If the sun's in the picture, chances are some highlights will be clipped, but in many cases that's going to be fine, as long as most of the histogram's curve is towards the centre of the graph.
• Much of the above advice applies if you're filming the sunset, too. If you're shooting straight at the setting sun, watch out for lens flare washing out the details. You can combat this by choosing a smaller aperture to let in less light and therefore darken the scene down, or use a polarising filter to block excess light or a diffusing filter to scatter it. A different approach is to omit the sun itself and concentrate instead on the landscape illuminated by its dying rays (this works for stills, too). To give yourself more options when you're editing, try to capture as much of both types of scene as you can while you've still got the light.