Welcome to Nikon School. The official Nikon education experts to help you learn how to get the best from your Nikon Camera and Lenses

Top Tips for Photographing Iceland

Blessed with waterfalls, icebergs, mountains, volcanoes and glaciers, and the spectacular Northern Lights in winter, Iceland has become one of the most popular photo locations for stunning landscapes....

Blessed with waterfalls, icebergs, mountains, volcanoes and glaciers, as well as glorious 24-hour daylight in summer and, of course, the spectacular Northern Lights in winter, Iceland has become one of the most popular photo locations for wild, otherworldly landscapes. Make the most of them with our expert tips.

The aurora borealis

Iceland gets a lot of cloudy days, but on a clear night with an aurora forecast of KP2 and above, if you can get to an area of low light pollution (basically anywhere outside of Reykjavik), you'll have the chance to shoot the Northern Lights. High-end modern DSLRs can 'see' the aurora better than the naked eye, so even if it seems quite weak to you, you'll be surprised what the camera captures.

To photograph the aurora, start off with an ISO between 1600-3200, set the lowest f-number your lens will allow – ideally anywhere from f/1.8 to f/4 – and then manually focus at infinity. To do this, try to find a faraway subject such as a bright star, or even a car head lamp, then move the manual focus ring on the camera until this subject becomes sharp. On some cameras, you may be able to use the Live View function and then zoom into the subject by pressing the magnification button as well to achieve this. Autofocus may work as well, but once you have achieved focus with it, do then switch to manual focus so you don't accidentally refocus on another, closer subject.
Depending on the strength of the aurora, a shutter speed of around 8 seconds should give you a decent image. You can then adjust the shutter speed accordingly to fine-tune the exposure and movement of the aurora in your image. Don't be tempted to shoot much longer than 20 seconds, otherwise you run the risk of star trails. It goes without saying that you'll need a tripod and cable release to make your aurora shots, and you'll need to switch the VR function off your lens if it has it. As you'll be setting up in the dark, do pack a torch to help you, but keep its use to a minimum if you're shooting near other photographers, so you don't 'light pollute' their images (headtorches that have a red light are best for this!)

Icebergs

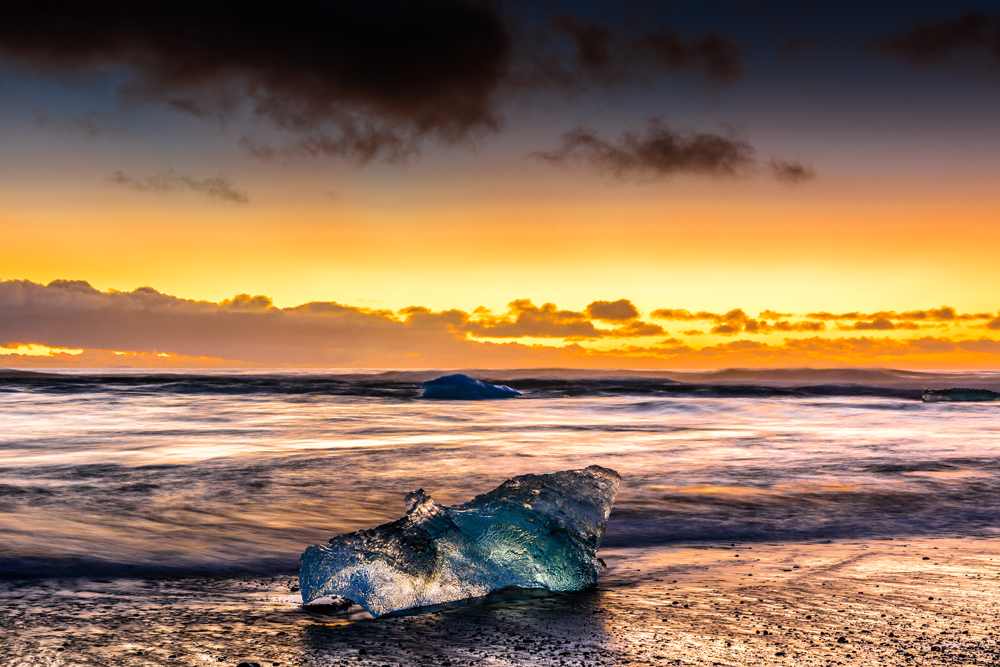
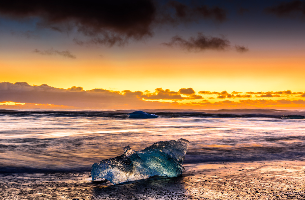
Ice has a magical quality about it. In Iceland you'll find icebergs with all sorts of colours, from clear to white, blue and black, or even a mix. The colour will also change as the light hits it, so photographing icebergs backlit at sunset or sunrise can give you a completely different look. Choosing a custom white balance can also influence how you want the viewer to perceive your image, by creating a cool or warm tone depending on what you set.

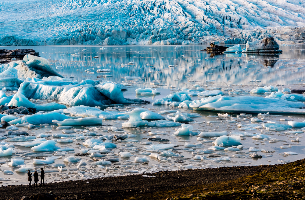
One of The best places to shoot icebergs in Iceland is undoubtedly the black beach by the Jökulsárlón lagoon, where bergs are constantly calving from the Breiðamerkurjökull glacier. When photographing them, the thing to remember is that they move, so you'll need to set a shutter speed that gives you the creative edge you are looking for, whether this is a high shutter speed to freeze the motion, or a slow shutter speed to blur it. If a wave comes in there is a possibility that your iceberg will float on it, depend on its size, and this may introduce unwanted blur, so you might want to check that your chosen iceberg is large enough not to be moved by the waves. For the sharpest pictures, a tripod and remote release are highly recommended.

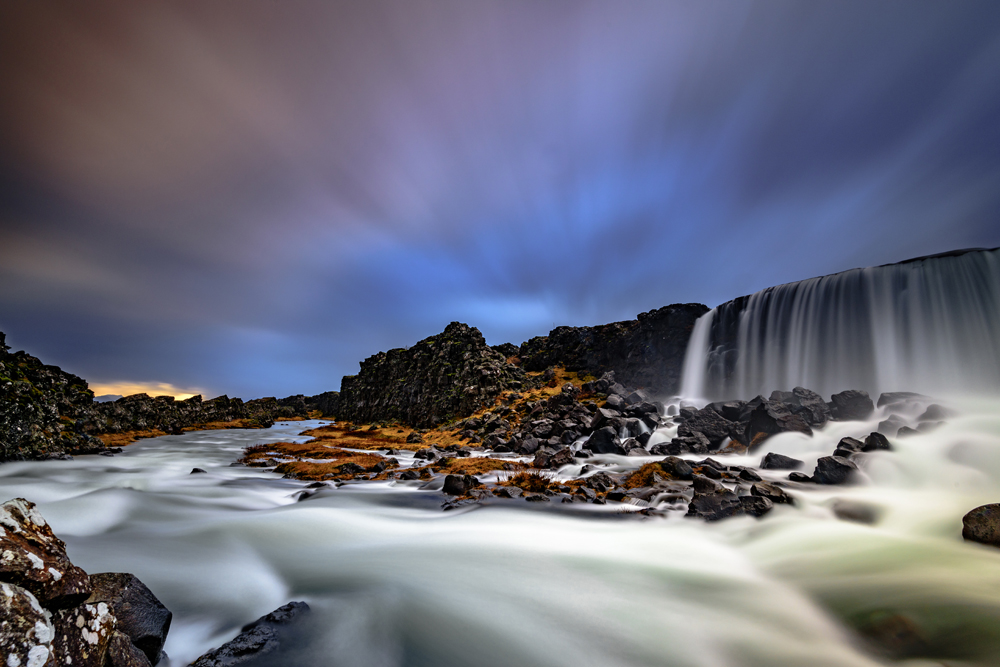
Icebergs come in all shapes and sizes, and images taken as abstracts either close up or against a contrasting background such as the black Icelandic sand make superb images. By changing your shooting angle, photographing from above or below the iceberg, you can make it seem far larger or smaller than it actually is. If you want to create interesting patterns, try a shutter speed of around 3-5 seconds, then release the shutter just as a wave breaks over the iceberg. As the water retreats from the beach and moves around the berg, the flow will be broken up into enticing leading lines around it.

Glaciers

More than 10% of Iceland is covered by glaciers, and they are pretty big – in fact, the Vatnajökull glacier is the largest in Europe – as well as being pretty dangerous. Like icebergs, glaciers are never still – constantly creeping, cracking, calving, creating crevasses and ice caves, and that means it's not a good idea to venture onto them unless you are with an experienced guide. The images here were shot on a 70-200mm f/2.8E FL to maintain a safe working distance, while bringing out the patterns and shapes in the ice. For wide glacierscapes, something like the 16-35mm f/4 used here will capture the immense size of the glacier. Adding people into your image can help give some sense of scale.

To get a large area of acceptable sharpness, try shooting with apertures around f/11, ideally with your camera's native ISO – 64, 100 or 200 – and a tripod and remote release.

Waterfalls

Iceland is awash with waterfalls, and the main problem you'll face is deciding which ones to shoot on a time-tight budget. Conde Nast Traveller magazine rates four as among the best in the world for photography: the 60m (197ft) Seljalandsfoss on the south coast, behind which you can walk to capture dramatic angles, along with the equally spectacular Gullfoss, Dettifoss, and Skogafoss (see picture to the left)

Waterfall images tend to fall into two camps: frozen with a fast shutter speed of around 1/250sec and 1/640sec to show the power and force behind the waterfall, or blurred so it's transformed into a smooth flow with an almost mirror-like finish. To blur the waterfall, set up your camera on a tripod with a remote release, choosing aperture priority, shutter priority or manual, and using mirror lock-up mode to attain the slow shutter speeds vital for longer exposures. The amount of blur you create depends on two factors: the speed at which the water is moving and your choice of shutter speed. A good place to start would be shutter priority mode with a shutter speed of 1/10sec, and move down to 1, 3, 10 or 30 second exposures from there.

On a bright day, to ensure that you can get slow shutter speeds, use a neutral density (ND) filter to stop too much light entering your camera. For extremely long exposures in bright light, you may need an equally extreme ND filter, such as a Lee Filters Big Stopper, which blocks 10 stops of light (althoug you may want to try the small stopper with 6 stops on waterfalls,as the big stopper may give too much blur). When shooting with very long exposures, best practice would be to cover the viewfinder eyepiece and lens distance window (if your lens has one) to reduce the chance of unwanted light entering the camera. Alternatively, you could also add a polariser; as well as reducing or enhancing reflections on the water, polarisers also act as a 2-3 stop ND filter, allowing slighter longer exposure times. If you use a shutter speed close to 30 seconds, the water should blur completely, giving almost mirror-like reflective capabilities. Think about using this in your image, especially if you have lots of light sources which could be reflected.

Skies

As the weather in Iceland changes rapidly – even in summer, it's very easy to have four seasons in the space of a couple of hours in the mountains or national parks – this means clouds tend to move very quickly. Use this to your advantage by adding an ND and an ND graduated filter to create dynamic movement in the sky portion of your image. To create a shot like this, set up your camera on a tripod, focus on a static object about a third of the way into the image at an aperture of f/11, then use either a 3 or 6 stop ND filter, with a 0.6 or 0.9 hard grad filter in front of the lens, to blur both the movement of the water and the clouds. Note that this type of images tends to work best if the clouds are being blown towards you, but it's still worth experimenting even if they are moving away.

Kit

When travelling by plane, you choice of kit is always restricted by the carry-on allowance, so put some thought into the real necessities for your trip, and omit everything else. For general photography in Iceland, a sturdy tripod and remote release are musts, along with lenses covering wide, mid and long-telephoto ranges. The 10-24mm DX or 12-24mm DX or the 14-24mm f/2.8 or 16-35mm f/4 are great for seascapes, waterfalls and the aurora, while a mid-range telephoto is very useful to just get that bit closer – the 16-80mm DX, 24-120mm f/4 or 24-70mm f/2.8 are ideal. If you want to travel really light, then consider just one lens, something like the 18-300mm DX or the 28-300mm f/4.5-5.6. While these lenses may not be a sharp as the ones listed above, they are more portable. All the images here were taken with three lenses: the 16-35mm f/4G, 24-70mm f/2.8E and the 70-200mm f/2.8E FL. And, if you have two camera bodies, it's worth packing them both, because if anything happens to your DSLR and you haven't got a spare, it's going to be a very frustrating trip…

Safety tips

• Watch the waves – they are big, powerful and often come higher up the beach and far more quickly than you might expect.
• Be careful with your gear – there are lots of people at some of the locations, so it's best to keep a close eye on it.
• Wrap up warm – the wind can be very cold, taking the overall temperature into minus figures quite easily. Layering is the best approach, and thermals are a must.
• Don't venture on to glaciers or around glacier terminal moraines without expert guides. It's safer to photograph them with long lenses or as wideangle vistas.

Nikon School Training

All of the photos in this article were taken by Nikon School Training Manager Neil Freeman on their recent photography workshop in Iceland. If you'd like to embark on a photographic trip of a lifetime to this stunning country, you can find out more about the next Nikon School course here.

Want to read offline?

You can now download a PDF version of this Hints & Tips article to read offline and print

DOWNLOAD

NIKKOR Lenses
NIKKOR Lenses