If you've got a garden, great images are just a couple of steps away. Here's how to make the most of your own green space.
If you’ve got a garden, great images are just a couple of steps away. Here’s how to make the most of your own green space.
If you've got a garden, great images are just a couple of steps away. Here's how to make the most of your own green space.
Think of your garden as the sum of all its parts – flowers, trees, shrubs, sheds, pergola, ponds, decorations (not forgetting the inhabitants, including birds and bees) – and capture as many of these elements as possible in an establishing shot. Spring and summer are the best times to get colourful establishing shots in the bank, although you might prefer the rich hues of autumn.
A sure-fire way to improve your garden photography is to shoot in the early morning or late afternoon, especially when it's overcast – direct sunlight can be too harsh for flower images, creating distracting shadows and bleaching out their colours, while cloud acts as a diffuser, creating a softer light that's ideal for natural-looking, perfectly saturated hues. However, if you want broader shots that capture the sky, you will need a sunny day – there's nothing appealing about a big slab of grey clouds looming over an image.
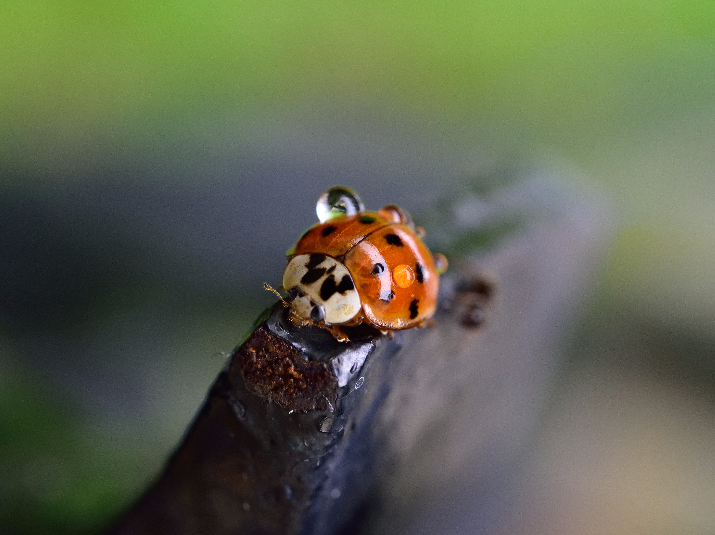
Flowers are very popular garden subjects, and they give lots of scope for different styles of photography – as well as the whole bloom, try focusing on small details, creating extreme close-up abstracts or unusual angles, such as directly down into an upturned flower or from behind. Insects such as colourful butterflies in frame can add an extra dimension. You might need to do some gardening, such as tidying up stray leaves and dead blooms, to ensure a cleaner, more impactful result.
Use a variety of lenses to cover different subjects and shooting styles. The 85mm f/3.5 and 105mm Micro NIKKORs are perfect for shallow-depth-of-field close-ups such as summer petals or frosted winter details, while telephotos are great for compressing features, such as a long garden or path with an architectural tree, bench or bird bath at the end. Versatile zooms like the 18-70mm and 18-200mm will cover plant portraits, medium to long-distance details and sweeping establishing shots.
If you have one, a fisheye lens such as the 16mm f/2.8 or the DX-formatted AF-DX 10.5mm f/2.8 can create eye-catching perspectives that immerse the viewer in the frame, and they are great for shooting upwards to capture a flower against a deep blue sky – you might need to use fill-flash to balance the exposure, however. Fill flash is also useful when shooting deep-set blooms like hollyhocks, to avoid dark shadows in their depths.
To minimise camera shake and help you concentrate on composition, it helps to shoot with the camera on a tripod, firing the shutter either via the self-timer or a cable release. Other blooming useful items for your garden-photography kit include a polarising filter to boost colour and also cut out glare and unwanted reflections on glossy leaves or water-feature surfaces, although as it reduces the amount of light coming through the lens, you might need to add a stop or so of exposure to compensate. A reflector is invaluable for filling in and minimising contrast; try one underneath or to one side of a plant to throw incident light onto it. You can buy small portable pop-up reflectors, or make your own from a sheet of white, silver or gold card.
This is key to the success of garden images. Expansive establishing shots require deep depth of field, where as much as possible in the frame is in focus, which means a setting a small aperture (large f-number e.g. f/16). Conversely, for a shallow depth of field where just the subject is in focus and anything in front of and behind it is thrown out of focus, you need a wide lens aperture (small f-number e.g. f/2) – a telephoto (or the long end of a telephoto zoom) will do this naturally for you, and can be used in place of a macro lens for capturing close-up details (just make sure you are far back enough to not exceed the lens's close-focus point).
1. Shoot wide establishing shots, zoom in a little for medium-range views, then get close-up to capture small details.
2. Look for clean lines and strong colors. Make your photographs more graphical by filling the frame with a single colour or texture.
3. Don't limit yourself to one format: shoot both horizontal and vertical images. Sometimes changing the camera's orientation will get rid of a distracting background or help you see an element you hadn't noticed before.
4. Early morning and late afternoon offer the best lighting of the day. Shooting during these times limits the harsh, bright light of the mid-day sun. Overcast skies also provide you with naturally diffused lighting.
5. If you are going to be shooting in a public garden, aim to get there as early as possible to beat the crowds – better still, ask in advance if you can go in before the official opening time.
You can now download a PDF version of this Hints & Tips article to read offline and print