Welcome to Nikon School. The official Nikon education experts to help you learn how to get the best from your Nikon Camera and Lenses

Getting the most from Nikon Picture Control Settings

Control the look of your images in your D-SLR with the help of the Nikon picture control system.

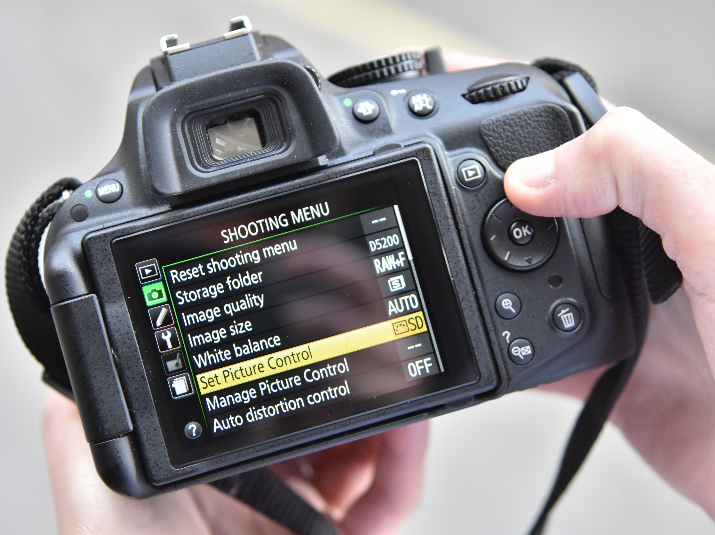
The Nikon picture control system enables you to easily control the look of your images in your D-SLR.

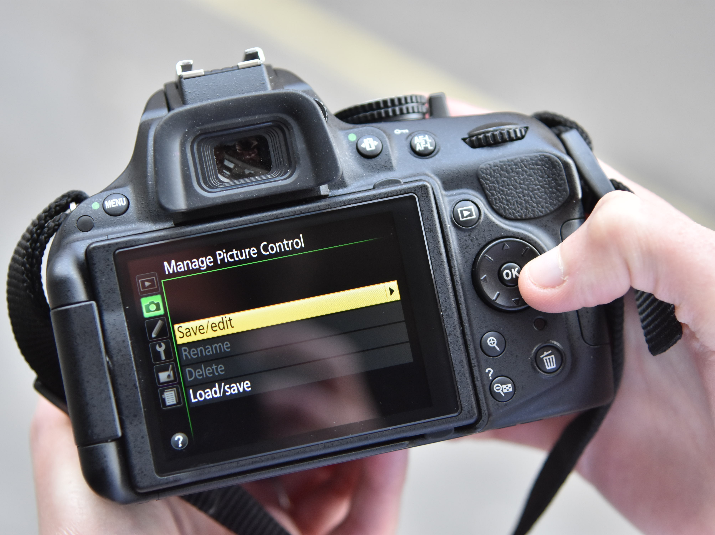
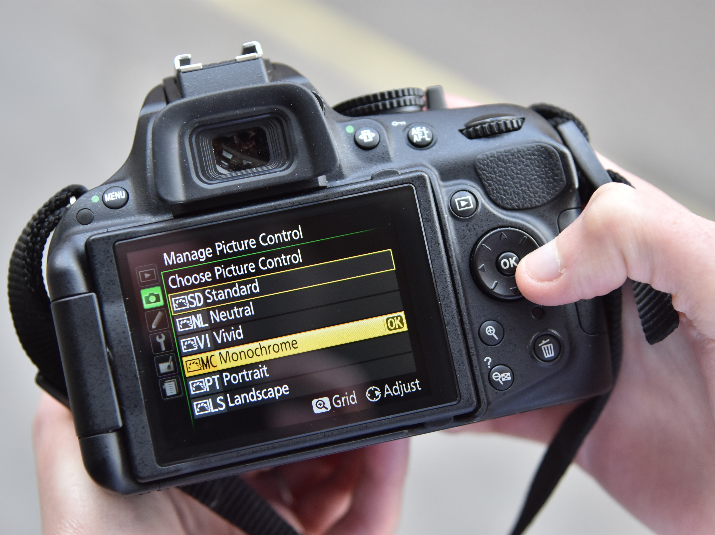
It is a powerful setting, and once you see how the atmosphere of your pictures and movies can be influenced via picture control settings, you will see the endless opportunities to create your own personal image styles to suit your taste. Picture controls are not just limited to still images either, you can also customise the look of the movies that you shoot with your Nikon D-SLR. What's more, you can also name and save custom picture control settings as new menu items and then quickly call them up via the menu system when you need that particular look.

Choosing the ‘Look’ to your images

Depending on which Nikon digital camera you own, you have various picture controls settings to choose from. These are Standard, Neutral, Vivid and Monochrome. Some Nikon D-SLRs also have an expanded range of picture controls including Flat, Portrait and Landscape.

The different picture control settings give you the freedom to change the look of your image and, in the case of Standard, Neutral, Vivid, Portrait and Landscape, allow for more adjustments to sharpening, contrast, brightness, saturation, and hue (colouration). Monochrome allows for adjustments to sharpening, contrast, brightness, filter effects and toning.

To change the picture controls, press Menu and then under the shooting menu, highlight Set Picture Control and press OK, now from the selection on the menu, choose a picture control and press OK.

Let us take a look at what each picture control does:

Standard

Suitable for portraits, landscapes and just about any other type of photograph, Standard picture control gives you normal looking, balanced images. This is the default setting for picture control.

Neutral

Neutral delivers images that are closest to the original scene. To reproduce the subject's unique colours and gradations with maximum authenticity, avoid extreme enhancements. Compared to Standard, Neutral gives a more soothing overall look and feel.

Vivid

For distinct, colourful, fresh-looking images with just the right emphasis on your subject's contrast and sharpening, use Vivid. Compared with Standard, Vivid gives a more 'punchy' overall impression. It's ideal for situations where you wish to emphasise primary colours, such as city streets, fresh fruits and floral arrangements.

Monochrome

Monochrome gives you monochromatic shadings, such as black-and-white or sepia. You can also select Filter Effects, to create the kind of results you get when shooting with a colour filter for black-and-white photographs. You can then further 'tone' the images to adjust the overall look of images in a way that formerly required working in a darkroom with photographic paper.

Customising your Look

With any of the picture controls, you can further customise the look and feel of the picture control settings to create your own personal picture controls.To do this, go to the shooting menu, highlight 'Set Picture Control' and press OK. Now from the selection on the menu, choose a picture control and press the right arrow on the multiselector. This now enables you to customise any of the following settings to create your own personal look to your images.

Sharpening

Sharpening enables you to alter the strength of your subject's contours, starting from 0 (no sharpening) to 9 (maximum sharpness). You can also set the camera to A (auto), where it makes adjustments automatically to match shooting conditions. The lower the number, the softer your image will be; the higher the number, the sharper the image.

Clarity

Clarity is a new addition to the latest Nikon D-SLRS. The level of clarity from -5 to +5 can be selected as well as A (auto) so that the camera automatically adjusts the clarity according to each shooting situation.

Clarity is useful when you want to make hazy-looking subjects look clear while maintaining the details, or when you want to make hard-looking subjects look softer and gentler. Effectively the lower the number, the softer the image and the higher the value, the clearer the image becomes. It's worth noting that while sharpening mainly controls the contours of a subject, clarity can control the subject's clearness while maintaining the gradation of highlight and shadow areas.

Contrast

You can fine tune the contrast of your images from -3 to +3. You can also set the camera to A (auto), where it makes adjustments automatically to suit shooting conditions. When set to the minus side, the image looks softer. When set on the plus side, the image becomes harder. A 'minus' setting is recommended when shooting portraits in bright daylight or if you think there may be overblown highlights. A '+' setting is suitable for when shooting a distant subject covered with mist. If you want to achieve a nostalgic-looking image with a soft and gentle feel, use a weaker setting. When you require clear and crisp images, make it stronger.

Brightness

The overall image brightness can be adjusted from -1.5 to +1.5. When set to the minus side, contrast is provided to the highlight areas and the medium tone (areas other than highlight and shadow) is made darker. When set on the plus side, the scene can be brighter while overblown highlights are prevented. This is useful when exposure compensation may result in washout in highlight areas.

Saturation (other than monochrome)

You control the saturation of images from -3 to +3. You can also set the camera to A (auto), where it makes adjustments automatically to suit shooting conditions. Moving toward the minus side results in a reduction in colour brightness; moving toward the plus side provides a deeper brilliance to the colours.

Hue (not available in monochrome)

Hue allows you to adjust the hue of images from -3 to +3. In effect this is the colouration of the various shades that make up an image. In terms of skin tones, the minus side increases redness, while the plus side enhances yellow tones.

Filter effects (Y/O/R/G) monochrome only

These filters provide an effect similar to shooting black-and-white photographs with a colour filter. Y (yellow), O (orange) and R (red) are effective to emphasise the contrast, with contrast strengthening in the order Y to O to R. This is useful when you want to decrease the brightness of the sky to make the scene look deeper and denser. G (green) provides a similar effect to shooting black-and-white photographs with a green filter, making some areas of an image appear deeper and denser. This can make the skin tone or lips look subdued, which is effective for portrait photography.

Toning (monochrome only)

This enables you to control the toning level of the entire image as if toning the photographic paper. You have a choice of 10 colours including the default B&W (black-and-white) setting. Moreover, you can adjust the density of the colours (other than B&W) in increments from 1 to 7.

Managing Custom Picture Controls

So you have now created a custom look for your images. You can save the settings of your personal adjustments in Picture Control in the camera so that you can use them again easily. This is done with the Manage Picture control settings in the shooting menu. For example, if you have created a picture control that gives a look such as "Portraits with a gentle atmosphere in bright sunshine" and you intend to use the same setting again in a similar situation, you can register the setting and save it in the camera, You can save up to nine custom Picture Controls in depending on which D-SLR camera you have

To create and save a custom picture control:

1. Edit the parameters outlined above based on a built-in Picture Control. Now select manage picture control

2. Choose save / edit

3. Select the picture control you wish to customise

4. Press right on the multiselecter to access the picture control custom settings page

5. Move the sliders until you have the settings you require and press OK

6. You can now choose which custom setting bank and the name you wish to use for your custom picture control

7. After saving your custom picture control, now you just need to select it and you are good to go with your own personal look to your images. Your custom Picture Control is indicated in the Picture Control list.

Want to read offline?

You can now download a PDF version of this Hints & Tips article to read offline and print

DOWNLOAD

NIKKOR Lenses
NIKKOR Lenses