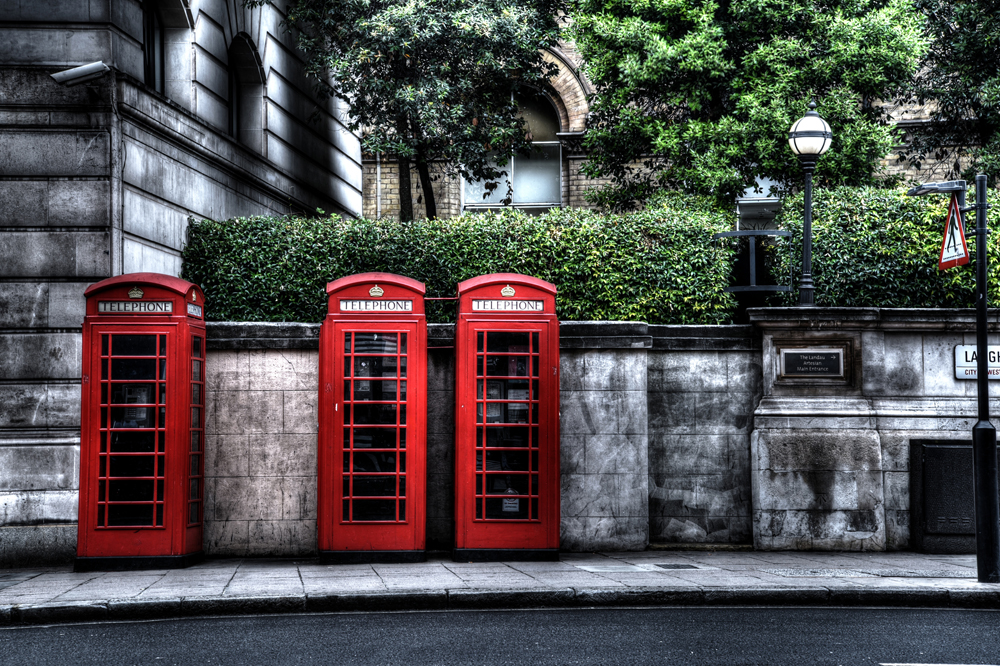
Make sure that what your eye sees is what your camera captures, by using HDR in contrasty light situations.
Make sure that what your eye sees is what your camera captures, by using HDR in contrasty light situations.
Make sure that what your eye sees is what your camera captures, by using HDR in contrasty light situations.
HDR – high dynamic range – imaging enables your camera to create an image that captures all the range of contrast in a scene, from the depths of the shadows to the highlights of the brightest areas. This is essentially how your eyes see, but it's a tall order for a camera to record the furthest ends of such a drastic range – if you meter for the highlights (the bright areas), you might lose detail in the shadow areas of the scene, while the other way round you risk 'blown-out' highlights.
A common example is a well-exposed room interior flooded with light from the windows. If you expose to capture what's outside those windows, the room's details will be lost in shadow. Another is when shooting outdoors: the sunlight that creates bright highlights will also create dark shadows, but expose for one and you'll lose detail in the other. When you make an HDR image, on the other hand, what you see is what you're going to get, because you create it with a series of bracketed exposures to capture both the highlights and the shadow detail.
Some Nikon DSLRs have a built-in HDR mode that does it for you. Available when shooting JPEG only, it automatically takes two quick shots – the first slightly underexposed (darker) and the second exposure slightly overexposed (brighter) – then combines them in-camera to create one well-balanced, tonally wide-ranging image.
To use it, select HDR in the shooting menu, then choose either 'On (series)', which means your camera will shoot HDR until you turn the HDR mode off, or 'On (single photo)' which, unsurprisingly, creates just one HDR shot then switches the camera back to normal shooting.
Next, choose the HDR strength (the difference in exposure between the two shots): if you're not sure, go for Auto to allow the camera to automatically adjust the strength according to the shooting conditions. Otherwise, 'HIGH' OR 'NORMAL' will produce a more natural look, while 'LOW' will create a more surreal, hyper-colour effect. When you press the shutter, you'll see 'Job [HDR]' flash in the control panel and viewfinder while the images are being combined, and you won't be able to take any other shots during this time.
While you can use the HDR mode handheld, a tripod will give the best guarantee of sharp, spot-on results – and it's essential with the DIY method.
If you want to do HDR yourself, it's also pretty straightforward. Using the autoexposure-bracketing (AEB) mode, select the steps of the bracket (± 1/3, 1/2, 2/3, 1, 2 EV etc.) plus 0 EV for the 'base' exposure. A five-step bracket (0, +1, +2, -1, -2) will work for most scenes, although you could try a simple three-step bracket such as 0, +1, -1. For more gradations of bracketing, you might need to select the exposure values manually (via the EV button and command dial), rather than use the auto-bracketing function.
The next step is to combine the bracketed images on your computer using your imaging software to create a single, full-contrast image.
With the DIY technique you can shoot in JPEG or RAW. A tripod is vital to ensure the images you take don't vary in composition, and that every shot is as sharp as it can be. Shoot in aperture priority, so your aperture is the same in each shot, with only the shutter speed changing with each different bracket.
• Use matrix metering with both methods, as this gives you the choice of setting the difference in exposure values (EV) between the two shots from Auto, 1 EV, 2 EV or 3 EV; with centre-weighted or spot-metering, your camera simply selects a 2 EV difference.
• Check on the histogram that you're not blowing out the highlights (where the spikes go off the top of the right-hand side of the graph) or blocking up the shadows (with the spikes going off the histogram on the left). If either is happening, simply adjust the aperture and, perhaps, the ISO, and start again.
• Remember to switch off Active D-Lighting and Auto ISO, to prevent them making adjustments to your exposures that would negate the effect you are after – a range of different exposures!
You can now download a PDF version of this Hints & Tips article to read offline and print