Welcome to Nikon School. The official Nikon education experts to help you learn how to get the best from your Nikon Camera and Lenses

A Complete Guide to Using Snapbridge

This is a quick, but comprehensive ‘how to’ guide for using Nikon Snapbridge with your smart device.

Complete Guide to using SnapBridge

This is a quick, but comprehensive ‘how to’ guide for using Nikon Snapbridge with your smart device. It is for version 2.6.2 of Snapbridge and note that the setup procedure is slightly different between iOS and Android devices due to how these operating systems work.

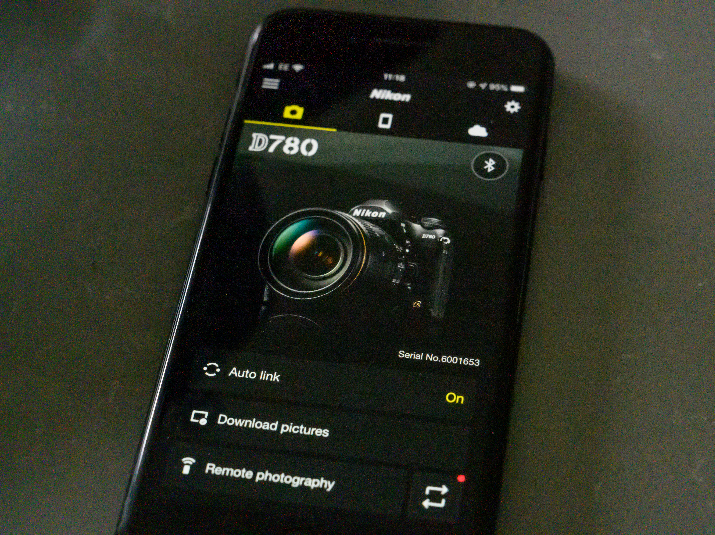
Snapbridge gives you a way to transferyour images from your camera to a smart device quickly and efficiently. On supported cameras, SnapBridge can be used to turn your phone or tablet into a remote trigger for your camera, which lets you remotely control key camera functions from your smart device. Snapbridge can also help to keep your camera up-to-date by automatically telling you when a firmware update becomes available for your camera.

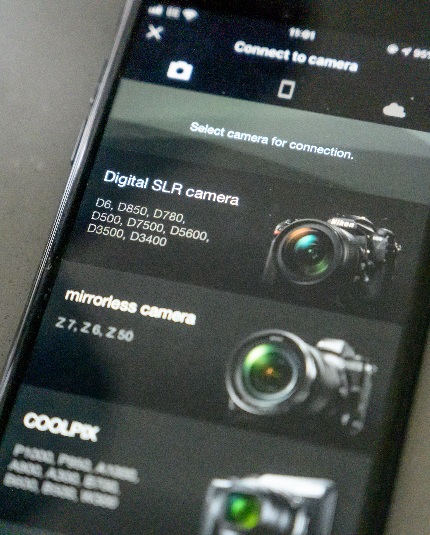
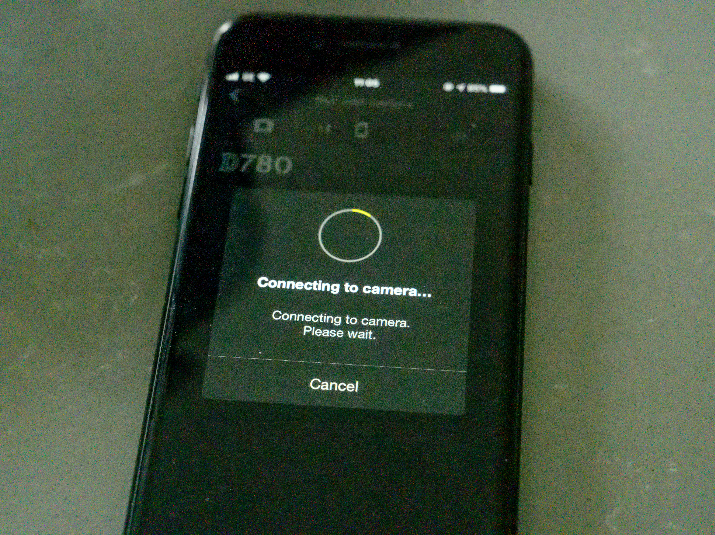
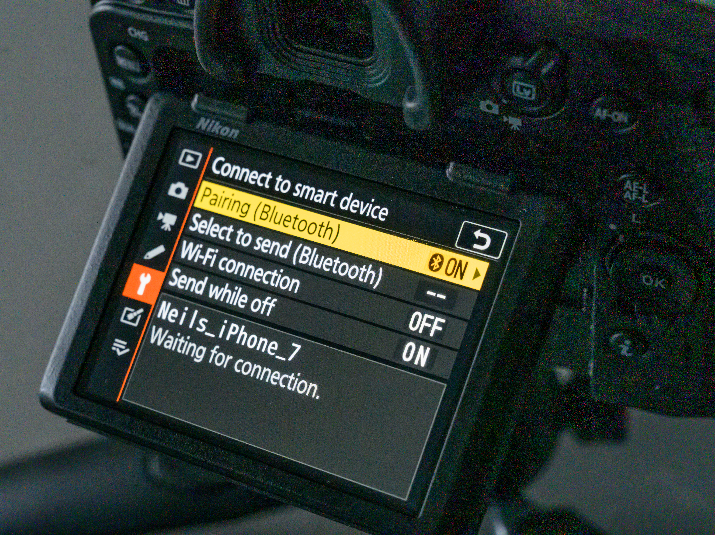
To get started, Once you have confirmed that your camera supports Snapbridge, download and install the SnapBridge app on your smart device. Before connecting, you should also turn on Bluetooth on your smart device. Once this is done, you are ready to pair your camera and smart device which is done via Snapbridge. You do not need to access the settings on your smart device at all, all of the pairing setup is done via the Snapbridge app. To make sure the pairing is a success, it is best to start with a fully charged battery on both the camera and smart device.

Pairing Camera & Smart Device

The video will show how to pair an iOS device to a D780, however, pairing another Nikon DSLR or Z series Mirrorless cameras is almost identical, as is pairing with Android devices:

- On your camera menu, navigate to the Setup Menu (Spanner Icon) then highlight and select Connect to Smart Device.

- Choose Wi-fi or Bluetooth as the connection method. At this stage we would suggest Bluetooth.

- Highlight Start Pairing, when the camera name is displayed on the camera, move to your smart device.

- Launch theSnapbridge App on your smart device and select the type of camera you are connecting to. Note that Snapbridge allows your smart device can connect up to 5 different cameras if required.

- When Snapbridge displays the camera name and serial number, press that on your smart device.

- Read the onscreen guide in Snapbridge to connect to your camera. Press Understood. The smart device will now search for any cameras in range.

- A connecting to camera icon will display, be patient, on successful completion of this step, which needs no input, you move to the next step.

- On iOS, your smart device will ask you to select an accessory, which should be your camera with the serial number, select this by touching the screen to confirm that is the accessory you want to pair with

- On your smart device you will now receive a ‘Bluetooth Pairing Request’ and a code number, select pair.

- Immediately on your camera, you should now press the OK button. If you wait too long between pressing the button on the camera and tapping the button in SnapBridge, pairing will fail and an error will be displayed.

- Your smart device should now confirm that pairing is complete, and the camera screen will return to the Connect to smart device option, showing the smart device you have connected to in the box at the bottom of the screen.

- Press OK on your smart device and you are ready to use Snapbridge.

When you launch SnapBridge for the first time, if the message ‘SnapBridge would like to access your photos’ is displayed, click OK, otherwise the app will not work correctly. Also, after completing pairing for the first time using SnapBridge, you will be prompted to choose auto link (auto upload and auto clock and location synchronization) options.

Using SnapBridge

Now that you have paired your smart device and Snapbridge, we can take a look at some of the main features in snapbridge and how you can make the most out of them.

Snapbridge Main Screen (Camera Icon)
When you look at the main snapbridge screen, it will show you the camera you are currently connected to, alongside the serial number of that camera as well. You will also see a symbol showing whether you have an active connection or not to a smart device, and if that connection to the camera is via Bluetooth or Wi-Fi.

Across the top of the screen you have on the top left a menu bar, the top right a settings cog wheel and under those there is a camera icon, phone or tablet icon and a cloud icon.

Menu Bar

The menu bar will show you which version of Snapbridge you are currently using, and any notices or information from Nikon. A red dot will appear by the notice ‘alarm’ symbol if there is new information to look at. This is a great way to find out if there is a Firmware update available for your camera.

You also have a help function which will link you out to the Snapbridge website, were you can research any further questions you may have about using Snapbridge

The App options section of the menu, contains some important settings that allow you to further customise how you use the Snapbridge app and the metadata that is encoded with your images as they are transferred. The settings in this section are:

Location Data Accuracy:

Determines how accurate the GPS tags written to your images will be. Medium is a good setting, you could choose High, but this will mean that the GPS module on your Smart device is working intensively in the background resulting in significant battery drain on your smart device.

Nickname: The name of your smart device as displayed in on the connected camera

Show Credits: When an image is transferred, the app will automatically add a small amount of camera metadata information, which is overlaid on the image and displayed in the corner of the image. You can choose a wide range of metadata to show such as; the camera model, lens used, aperture and shutter speed or copyright info, time the image was taken or comments. You can use this setting to really customise the way your image data is displayed automatically by also changing the font type, style and colour.

Add Hashtag: This allows you to automatically add hashtags to your images as they are transferred, ready for upload to social media.

Settings Cog Wheel

Here you can choose from a range of features such as; adding additional cameras, switching between various cameras you have paired to your device or removing any cameras you no longer require to be paired. Snapbridge can pair with up to 5 cameras, although only one can be an active connection at any time.

You can also switch the connection from Bluetooth to Wi-Fi under this setting as well as downloading location data to the smart device.

Autolink

Will automatically connect your smart device to a pair camera as long as the devices are within range and the camera’s bluetooth function is set to on. Within the Autolink setting you can further fine tune how the camera downloads images to the smart device. You have the option to download either a 2 megapixel JPEG file or the original file as long as your smart device can support the file format. You can also synchronise the clocks between the camera and smart device as well as synchronising the location data. If you need to conserve battery power on your smart device, use the Power-saving mode.

Download Pictures

You must be connected via Wi-Fi to use this feature. The app will automatically step you through the process of making a Wi-Fi connection to your camera, if one is not already established. Be patient while the camera and smart device ‘handshake’ to make the connection. On some devices you may be prompted for a password which is displayed on the back of your camera's screen in the Connect to smart device menu. You could also be asked to Join the camera’s Wi-Fi network depending on the device you are connecting from. Once connected via Wi-Fi, Snapbridge will display all of the images and videos that have been recorded on the camera. You can now select one (or more) of the images or videos to transfer to your smart device. Press Select in the top right corner of the app screen and now tick the boxes on each image that you wish to transfer to your smart device. When you have completed your selections, press download at the bottom of the app screen and you will be prompted to choose if you want a 2 megapixel JPEG or the original format transferred to your smart device. Please note that video files can only be transferred over a Wi-Fi connection from your camera and smart device. The screen will now revert back to the main screen and you will notice some bars appearing between the camera icon and phone / tablet icon at the top of screen indicating that a transfer is taking place. A dot will appear next to the phone / tablet option showing that you have recently downloaded files. You can now either use the gallery function in Snapbridge or the gallery on your smart device to see the images or videos that have been sent to your smart device. The images and video still exist on the camera's memory card.

Remote Photography Options

You can also use Snapbridge as a remote control for your camera. There are two options for you to control the camera remotely. You can choose to control the camera settings and live view focusing with Remote photography or just use the app as a Remote bluetooth trigger to just take your images without touching the shutter release on the camera.

Remote Photography

When connected to your camera via Wi-Fi, your smart device can display a live view of everything your Nikon camera sees, so you can compose shots on its screen, alter camera settings and then remotely fire the shutter. Remote Photography only works over a Wi-Fi connection which the camera will automatically establish using the snapbridge app. On some smart devices you may need to go into the Wi-Fi settings on the device to establish
the connection.

Within the Remote Photography option, if we go from the top of the screen you have the following features:

Stills / Video Icons:

Use this to switch between video and depending on what you would like to shoot

Shooting Mode selection: Choose the shooting mode you wish to use, either Manual, Aperture Priority, Shutter Priority or Programmed Auto.

You can also see the download image quality setting, number of remaining images on the card and current real time battery level displayed to the left above the live view screen.

Live View Screen: Use this to activate the touch autofocus (assuming the lens on the camera) is set to autofocus. Wherever you touch in the Live View display on your smart device, the camera will now focus at that point and take a picture.

Control Bar: Here you can touch any of boxes to change either the shutter speed, aperture, exposure compensation, ISO adn white balance on the camera.

Gallery: Showing you the last image in the gallery on your smart device Shutter / Record Button: Press to either shoot a still image or start recording a video.

Settings Cog Wheel: Gives you the option to automatically download the remotely captured images to your smart device, set the self timer feature and toggle the live view screen on or off.

Remote Photography Mode Select

The icon (two arrows above each other) on the bottom right of the screen next to the remote photography bar, allow you to toggle between either full remote live view capture via the camera - this is the Remote photography setting. Alternatively, you could just use your smart device as a Bluetooth trigger in the Bluetooth remote control mode.

Phone / Tablet Icon

This setting shows you the Snapbridge Gallery and all of the images that have been copied from the camera to the smart device. It is usually displayed in date order so you can quickly and easily find your images. If you want to select any images, you can press on the 3 dots in the top left corner to access options that allow you to select multiple images if required.

Cloud Icon

When you've paired your camera and smart device, if you register for a Nikon ID you can access Nikon Image Space for free automatic uploads of unlimited thumbnail pictures, plus 20GB of free automatic storage for full-size pictures and videos. This means you don't have to overload your smart device with all the images you shoot. Use the Nikon Image Space mobile app to access your uploaded images anywhere and organise them into albums and themed galleries, by capture date, upload date or the Nikon camera they were taken on, for easy sharing.

Camera Options

It’s worth noting that the connection between your camera and smart device stays active as long as the camera battery is in the camera and the smart device is close by. You can even set up Snapbridge so that images will sync from the camera to the smart device while your camera is in sleep mode. This means that even when your smart device is in a bag or pocket, images will still be transferred as long as it’s within the range of the camera. SnapBridge maintains the constant connection with your camera via Bluetooth low energy (BLE), which ensures ultra-low battery impact on both your smart device and the camera.

Depending on the camera you have, you will also have menu options to send images to your smart device from the camera menus. The options are either found in the Playback or the Setup. You will be able to select Automatically send all images to your smart device, or just manually send individual images. Another feature to consider is the ‘Send while off’ option, this will continue to send images to your smart device even if your camera is turned off. This can be very useful depending on your approach to photography.

Want to read offline?

You can now download a PDF version of this Hints & Tips article to read offline and print

DOWNLOAD

NIKKOR Lenses
NIKKOR Lenses